Showing posts with label Solo yarn. Show all posts

Tuesday, June 29, 2010

Celtic Critter Cardigan: More Swatches

Celtic Critter Cardigan 1wdragon I think I'm getting perilously close to the point where if I continue swatching I'm going to have done a sweater's worth of knitting without having knit a sweater.

That is part of the peril of designing your own sweater. Especially one with so many motifs.

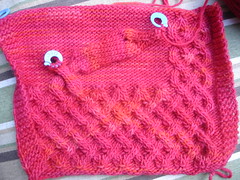
Here you see the dragon head swatch. Can you make him out in the photo? He still needs to be tacked down and finessed.

The stitch marker on the left was intended for a second dragon, but I realized I wouldn't have room so I skipped it. After all it's just a swatch.

The book then says something along the lines of "attach dragon with applique techniques." As though that means something to me. And I suddenly thought, "Hmm, there is going to be a lot of fussy finishing involved with these dragons. Maybe I don't want as many as I originally thought."

Currently I'm thinking I'll whip stitch the dragon in place from the wrong side of the cardigan, i.e, reach up from inside.

In the book, there is a picture of the dragon with little whiskers embroidered on. They really enhance his looks, but embroidery is so not in my skill set. I had the swatch and the book in the store recently. Pam and Jane (one of our regular teachers who is a little flashier than me) were trying to convince me to use some sort of shiny red yarn for the whiskers to make him really pop. I am debating this idea. It might stand out too much. But that is rather far down the line.

Cuff Reject
Celtic Critter Cardigan cuff reject As I mentioned last time, the top swatch is for the bottom hem and the front opening.

I was also planning that cable for the sleeve cuff. However, there are so many cool cables in Viking Patterns for Knitting that I couldn't resist the idea of perhaps incorporating more of them into the cardigan.

The result was a swatch of the one you see here, which is one I like and think looks "cuffy."

However, it looks anemic in comparison to the main cable, so I'm not going to use it.

In case you're wondering, there is a half cable on the left because I'm making all the swatches over 48 sts regardless of pattern repeat. My theory is this will make it easier to measure them for gauge and give me a better idea of how they might pull or flair. 8x8 swatch indeed.

Back Motif
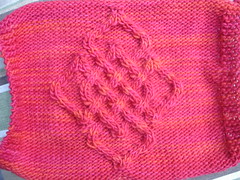
Celtic Critter Cardigan back swatch The next swatch was this beautiful cable you see here. This is one of my favorites out the of the book. It's the Happiness Symbol Bisected by a Ring (or something like that). A smaller version, without the ring, is what I had wanted to put on the heel of the Angora Bed Socks of Power and Fortune!, but couldn't remember how to make it.

My plan is to center this on the back of the cardigan to break up the expanse of reverse stockinette stitch. I needed to know how tall and wide it will be so I can plot it.

I learned two things from swatching it.

First, it seems to pucker more than the other cables. However, I haven't blocked any of them so I'm not worried about it. Also, it will have the weight of the sweater pulling it straight.

Second, I'm going to have to float stitch markers up the entire sweater for it, or carefully plot the number of stitches it will be from the edge. The chart only has 4 sts on either side of the outer edge shown. Centering the very beginning of the cable in the middle wasn't a problem, but I got a little confused when it was time to work the increases for the outer rings.

See, swatching really is our friend!

Dragon Down
Celtic Critter Cardigan dragon 2 The last swatch (I thought) I knit was this wee one. Obviously not on 48 sts!

My plan is to have the cables grow up from the sleeve cuff and stop in dragon head(s) near the elbow. Then I want the cables to resume on the upper arm. The kind I'm using have stop and start points so I can skip a section like that.

What I didn't know what whether I could essentially work a dragon "down." As you can see, it came out just fine.

When I finished this second dragon I thought, "Phew. I've swatched my fingers off. I can figure out my gauge and start the scary math."

Ah-ha! Not so fast.
It occurred to me I had edged all my swatches in garter stitch, as you do.

I was planning to edge the sweater in four rows of seed stitch, just to be difficult.

It occurred to me I should swatch, again, with the seed stitch border to make sure it really will control curling and look alright.

The anti-curling objective seems to have been met. In the looks department it's kind of blah. The very bottom hem blends in with the rev st st of the body, which might be just as well, but is kind of annoying since seed stitch is so much work. However, on the sides, which represent the front opening, it looks just fine.

I'm also using this last swatch as an opportunity to work a shorter version of the main cable to see if I prefer it for the sleeve cuffs. The jury is still out, mainly because I haven't knit enough rows yet.

Color Variation
I don't know how well you can see the color variations among all the swatches.

Brooks Farm Solo is a hand-painted yarn. The general rule of thumb when working with hand-painted yarn is to blend the color variations from skein to skein by alternately working two rows from two different skeins. (i.e., rows 1 & 2 with skein A, rows 3 & 4 with skein B, back to A, etc.)

I wasn't planning to do that because I'm, you know, lazy.

However, seeing the difference in the colors of the various swatches when I had them laid out side by side for the photo shoot was very surprising.

Remember, I bought them all at once and they are supposedly the same dye lot.

But some of them look decidedly pink or washed out red in comparison to the others. After I saw it in the swatch I could even see it in the balls.

Also, I'm continually surprised by the amount of orange. Don't get me wrong, I like it. I think it is popping up in the cables in an interesting manner. And I realize it will be different spread out of the entire width of the cardigan rather than a wee 48 sts swatch. But still, hello orange.

Of course, all these color concerns are much more noticeable in the sun than they are in the living room.

The point is, I'll be alternating skeins.

I have three hanks I haven't balled yet. For some reason the colors seem more noticeable when in ball form. I'm going to try to determine which are pink and which are red and make sure I pair them up as much as possible.

Soon. Soon I will be able to start the real knitting on this cardigan.

Considering Mom just reserved our hotel room for Rhinebeck 2010, I better knit fast!

Friday, June 18, 2010

Celtic Critter Cardigan: Swatch!

Celtic Critter Cardigan swatch For all my whining about not having time to knit lately I sure am starting projects like a fiend.

But, again, I have a perfectly legitimate excuse.

Shirley Paden was teaching her design class at Westport Yarns last night.

Now, we all just lived through me designing the Schleppy Sweater and the Bias Striped V-Neck so you might wonder that I would be interested in taking a design class. Well, I'm no fool.

Actually, I think it's been well established that I am a fool, but I'm a clever fool who knows her limitations.

I figured there would be tips and explanations and easier ways to do things.

You know what I've learned so far?

The scary math is still scary.

That was a bit of a relief. It wasn't just me. One of our teachers who has designed plenty of lovely patterns was sitting next to me and we were both like, "Wow, the math still sucks."

Granted, Shirely did it much quicker than I've been doing it, which gives me hope that it will get easier as I go along, but the steps are still the same.

She discussed the steps we should take as we approach our design. Really thinking about and writing down what we want the sweater to look like and the qualities it should have. She said these steps are our foundation and we shouldn't skimp on them. Also, we should make ourselves very familiar with our pattern stitch since it is the fabric of our garment.

Then we paired up and took all our measurements. She had a nice chart for us to follow and clarified some of the tricky bits.

Then she did all the scary math with a sample sweater and made up numbers.

I was very surprised I didn't dream about gauge last night.

We didn't touch the swatches.

I got an e-mail last week saying we should have a sketch and swatches done to bring to class.

Turns out she usually does this class as one marathon six hour day (with a break for lunch). However, ours was broken up into two three-hour sessions. Aaah. The swatches and that part of the process will come into play during the next session. I never got the second e-mail pointing it out.

No matter, I was going to have to swatch eventually.

Celtic Critter Cardigan: The Vision
This is a sweater I've been thinking of since before Rhinebeck. I can pin it to that time frame because I went to Rhinebeck with the mission of buying the Brooks Farm Solo to make this sweater.

It's a chicken/egg situation. After making my cropped poncho I wanted to make a sweater out of the Solo, so I started dreaming one up.

I've mentioned in the past that I'm slightly obsessed with Viking Patterns for Knitting by Elsebeth Lavold. Well, all the cables are being pulled from that book.

Toward the end of the book she has a section on the intertwined animals and directions for making the dragon heads. I knew I had to use them on something.

My idea is to have a big, braided cable go around the bottom hem, continue up the front opening, and around the hood opening.

To make the dragon heads you don't close off some of the cables, you continue them for a little neck, then make the head. I haven't decided how many little critter heads I'll have along the hem. I suppose it depends on how many pattern repeats I'll have.

Then I'll have a smaller version of the cable along the sleeve cuff. The center will continue up the arm and end in critter head near my elbow. I'd like to have a cable that starts with critter heads on the other side of the elbow, goes up the upper arm, and ends at the shoulder.

But I have to figure out if I can work the critter head upside down. You know how you loose have a stitch when you flip knitting. I don't know how much that will effect it. Which is what swatching is for.

I'd also like to have the cables on the hood extend into dragon heads, but at that point it will be the side of the cable. No points for the dragons to grow from. I'll have to think on that.

Then I was thinking a "happiness symbol" cable on the back. She also calls it the St. John's cross. It's neat and would break up the expanse of plain knitting. Of course, I could make critters come off that as well.

I should have been writing these ideas down as I came up with them. I know I've changed and tweaked things. When I finally sat down to start swatching I seemed all the ideas flew out of my head and I was like "What was I going to do on the sleeves?"

It didn't help that I have other pattern ideas floating around up there and things were getting kind of jumbled.

Everyone who saw my swatch last night thought it was very cool.

More measuring
After I got home last night, which was at like 10 pm! I was looking at the class materials and considering ease for the sweater.

All the measurements we took were actual body measurments, so I had to tack on ease.

I'd been figuring 4 inches, which lands it in the "roomy" category, because I want it to be an outdoor cardigan. One I can wear over other shirts and such when the weather gets cooler.

I ended up measuring a short leather jacket that I have. I like the fit and length of it and think it would be good dimensions for the cardigan.

It's a good thing I did because that jacket is 23 inches long and the length I had written down on my chart was only 19. Also, we didn't measure the "bottom of garment" point consistently, so my armhole to bottom of garment measurement was all out of whack. I wrote down all new measurements based on the jacket dimensions.

Now all I have to do is the scary math.

I think I swatch some more first.

Wednesday, June 16, 2010

Swift

Swift and a ball winder, too!

Yes, I splurged a little over the weekend.

But it's totally justified.

See, I've survived all these years without a swift and ball winder combo because I could just use the ones at the store. I would either wind the yarn when I bought it, or bring it with me when I worked.

This was a good system. It also allowed me to spend money on yarn rather than these tools. Of course, I had to wait until the weekend to wind or make a special stop on my way home from my day job, but it worked.

However, I recently required a metric ton of yarn from a freelance client that I'm going to start swatching and talking about. Much of it is in hanks that need to be wound before I can use it.

Now suddenly I need to be able to wind any time of the day or night. Doing it all by hand would just kill me. Shoot, I recently wound a skein of sock yarn by hand, it took a good half hour or longer.

Granted, winding by hand is a bit of a work out (if you squint. Work with me here. I brace the yarn over my feet so I have to lean forward and back to wind. And then you get the arm work out. Come on, if fidgeting burns calories winding yarn by hand totally has to.) and I'll be missing out on that, but time is of the essence.

Priorities
Of course the first yarn I wound wasn't client yarn.

No, it was a skein of the Brooks Farm Solo I bought at Rhinebeck.

But it was totally justified.

Remember how Shirley Paden was the guest speaker at the grand opening for Westport Yarns?

And she was signing her new design book? And I got a copy?

Well, tomorrow she'll be back at the store for another book signing from 5pm to 6 pm. Then at 6pm she'll be teaching part one of her sweater design class.

And I'm going to sit in on it. The homework was to have a sketch and swatch of your potential sweater. I don't have a sketch, but I've been swatching my fingers off.

Yes, yes, I successfully executed the Schleppy Sweater. And the Bias Striped V-Neck looks good on paper.

But I'm sure she'll be sharing all kinds of tips that will make life easier going forward. And I'll have an even deeper understanding because I've been through it once (twice?). I'll totally know what she's talking about.

This sweater is going to be a cardigan with Celtic cables and a hood. I've apparently never mentioned it on the blog before and don't have any off-line notes about it. However, I've been thinking about it for quite a while now, so I'm sure the execution will be fine.

Puppy Response
That is Samson checking out my new toys in the picture.

As you might imagine Baru was frightened by them. I swear that dog gets more timid the older he gets.

Thursday, October 22, 2009

Rhinebeck: Stash Enhancement Solo

BFY solo NY 18 Finally, the post you've been waiting for!

Of course yarn was purchased.

But I was smart, I went in with a budget, cash, and a (vague) plan.

Solo
I knew for sure that if I didn't buy any other yarn I was going to stock up on Solo from Brooks Farm Yarn.

You might remember I was introduced to this yarn last year when Cynthia gave me a skein. I used it to make my Cropped Poncho. Well, I found it so lovely and squishy I decided I needed more.

When I was working on that uncooperative hat the other week, I was inspired with the idea of making a cabled sweater. A cardigan type that I could wear over other tops as a transition piece during the fall. Since I knew by then I was attending Rhinebeck, it made sense to get yarn for this potential sweater. (Especially since I'm making such awesome progress with that other cabled sweater I'm designing. [which would be none.])

I was thinking blue. Or maybe green.

As you can see I ended up with a glorious red. Turns out Brooks Farm is a very popular booth. I found a single skein in a nice green and asked whether there was more. The guy said what's out is it and there used to be 11 others just like it. sigh.

I considered getting one of their other yarns that they did have in green (or blue), but I had my heart set on Solo.

I ended up with six hanks in the NY18 color way. It is different than my poncho color. My poncho is dark red, with hinds of brown and dark orange. These new ones are more bright, scarlet red, with just a hint of orange. Trust me, they are different.

I had calculated that five hanks should be enough (they are 400 yards each) but there were six on the pegs and I didn't want some other poor knitter to go through what I just experienced with the pretty green one. Besides, what if I had stuck with the five and run out!?BFYSolo NY18

Step Away from the Yarn
I got into the long line with my treasure. We were all chatting as we inched up.

Near the register was a rack of single skeins that were on sale. Some yellow caught my eye, so I switched the position of two skeins so I could get a better look at it.

It was a single hank of Solo. It was bright, sunny yellow and tangerine. It was like sunshine glinting off a glass of Tang.

I was mesmerized.

So I added it to my pile.

Then I reconsidered. It was only marked down $3. What would I do with a single hank?

I put it back.

Then I thought I could make another poncho and took it again. Then I put it back. But I had to give it a pet.

By now the lady behind me was laughing. I asked what she thought. She said I should get it, but pointed out she wasn't the best person to ask. I agreed that for that advice I should call my mom.

I took it again. Then I saw P from the store. She hadn't seen me yet. I held up the beautiful yellow skein and called, "Hey, P! What do you think?"

She told me to put it back. She said it as orange and she never saw me work with orange, so I obviously didn't like orange.

I put it back again. At which time the lady behind me snapped it up. Proving she was only encouraging me to get it so she couldn't! Oh, these games us yarn lovers play. At least it got a good home.

I also thought it was interesting that I looked at it and saw yellow, but P looked at it and saw orange.

Ah, drat, I really have to get to work. More yarn was bought, but will have to wait.

Sunday, December 7, 2008

Poncho Power!

poncho doneThe Solo Cropped Poncho is finished!
I wove in the end of the tail around 8 am yesterday.

Stats Recap

The pattern is 04 Cropped Poncho from Rebecca magazine #32.
Needles: US 7 & 8
Yarn: one skein of Solo yarn from Brooks Farm in TX. I had about 3 feet left over.
Modifications: I shortened the collar to 7 cm and the total finished length is about 34 cm (compared to the 20 cm collar and 50 cm length called for in the pattern).
I figured I would work until I ran out of yarn, realizing I would probably have to tink at least one row to have enough to bind off. I ended up have to pick out a row and a half. When it looked like I was almost out of yarn I started to bind off, but it was a mess with the YO. So I tried to work a row of K1, P1 rib to make things pretty, but at the half way mark (I had a marker in place) I realized I was going to be short, so I took out that ribbing and then a row of Fisherman's Rib. Then reknit straight K1,P1 rib and finally bound off using the Russian Bind-Off as explained by WendyKnits here. phew.

Public Reaction

It has been well received. I put it on and Hubby was all like "Hey there, pretty girl."
I wouldn't have thought a poncho was such a flattering garment it would get me extra kisses. (It probably didn't hurt that I had just washed my hair, so I was all shiny and fluffy along with my pretty red poncho.)
Of course, I had to wear it to the store so other crafters could admire it.
Cynthia said it was gorgeous, so I pointed out it was the yarn she gave me.
And other people during the day thought it was adorable.

The Right Pattern Makes a Difference
I had always figured I wouldn't knit a poncho, even during the height of the craze—what two years ago?— because I didn't want all that material all over me making me look like a piece of furniture.
Hubby had suggested once before that I make a poncho. We were out somewhere and another young couple walked by, she was wearing a woven poncho that looked good. But she was slim (like me) and the material was thin, so it wasn't all over whelming.
This poncho, however, being cropped and from a DK weight yarn, isn't overwhelming in size, weight, or warmth.

Have I Been Unfair?
I spent so much time complaining about the Fisherman's Rib when I started this poncho, that I wonder if I will scare other people away from the pattern.
I am only one of three people on Ravelry who have made it, and the other two didn't blog about it (or didn't link their blog posts to their project), so the only thing people have to go on is my early struggles.
Oops.
The stitch wasn't too bad, once I finally got the hang of it.
And I think the finished poncho will be quite usable. Since I'm off the train I'm back to my 45 minute plus commute by car. In the winter I run into the difficulty of wanting to be all bundled up against the cold, but then once the car warms up, my coat is all hot and restrictive (and I have a long coat to boot.) Yesterday when I left for the store I took my coat off, but I was still warm enough with the poncho on.
But at the same time, on the way home I had to stop at the grocery store. I had the poncho on under my coat, but I didn't get to hot.
So really, it's going to be rather useful in this weather, as well as in the office when the HVAC isn't to my liking.

In Other News
My poor, neglected little Christmas Cactus is blooming!christmas cactus
Really, you don't understand the adverse conditions this poor thing has to contend with. Unlike the dogs, my plants can't tell me when they need attention.
If your Christmas Cactus isn't blooming, you might want to evaluate the lighting situation. When I was at the paper in New Hampshire I used to do regular seasonal interviews with the owner of a green house in one of my towns (who also happened to be one of the selectmen). He told me that Christmas Cacti actually rely on the changing light conditions to know when to bloom. So if it is only exposed to artificial light its cycles can get messed up.

Tuesday, December 2, 2008

I Should Stick With Socks

The poncho is creeping along.
The more rows I work, the more increases occur, the more stitches I have on the needles.
I'm at 57 rows and 136 stitches.
I have the 20" cord stacked with the 16" cord from my Denise set, which is, I think, the longest cord I've built since I've had it.

Increasing in Fisherman's Rib
In an attempt to be one of those useful knitting blogs were you actually learn something that you can apply to your own knitting, I will now overwhelm (and underwhelm) you with pictures (that will probably be too small to see since I made them thumbnail size. Clicking one should take you to my Flikr photostream where the decent sizes resign.

Increasing Fisherman's rib 1The pattern instructions call for working the increases by working K,P,K all in the first stitch after the marker. (Or at least that is how I'm interpreting it. And, since I'm being consistent, all my increases look the same.)
On the row after the increase row the three increased stitches are on the left side of the first marker. But I want to maintain 7 sts between my markers, so some fiddling has to take place.

Increasing Fisherman's rib 2Remove the marker and work the next two stitches in pattern (stubbornly ignoring the fact that you are knitting a stitch without a yarn over. I tried to stick a yarn over in on one of my first increase rows, it made things too tight) then replace the marker.

Increasing Fisherman's rib 3Work the next stitch (the third increased stitch) in pattern and then continue working in pattern to 3 sts before next marker.


Increasing Fisherman's rib 4The next 3 increased stitches are before the marker. But, again, I need that marker to be at the end of my center 7 sts. So I slip them all without working them, remove the marker, then slip the sts back.


Increasing Fisherman's rib 5Then I work one stitch in pattern, replace the marker, and resume working in pattern. I'm now back to 7 sts between my markers.


A line of increasesIn this picture, if it wasn't microscopic, you can see the ribbing branching out from the previous increases, while maintaining straight ribbing down the center. Just like in the pattern picture. yippee! This wasn't happening on my, uh, second attempt. On my second attempt I was not fiddling with the markers, so the increases were growing on the outer edge of the previous increase. (huh? never mind.)

The pesky center stitch Here you see the pesky edge stitch that I keep complaining about. I have a red marker on one side and my row counter on the other to lock it in place. The problem with the edge stitch is that on every other row it can almost be worked in pattern. The pattern is K1 w/YO, S1 making YO. When I come back around to it this time the last stitch of the row will be a K1 which makes it easy to slip the edge stitch. However the next stitch after it (the first of the new round) is also to be slipped. So instead I end up working K1 w/ Yo, K1, S1. Then on the next row I'll work S1, K1, K1 w/YO.
I think you can see how the darn thing ended up taking a walk on me before.

Why am I torturing you with all this?
Well, first, I'm home with a migraine, which always makes me a little incoherent (I'm going back to bed as soon as I publish this. I had an interview at 9 am and I have another at 3 pm, so I must rest).
Second, I saw in my traffic report that some poor soul ended up here because they had searched for "increase fisherman's rib" and I realized I've complained about having to do it, but never explained what was going on once I figured it out. Hopefully I've remedied that oversight.

Monday, December 1, 2008

Slow on the Uptake

The poncho is progressing nicely.
I know I supposedly said that on Thursday when things were actually falling to pieces, but we've already established that I was bluffing on Thursday.
Today it really is progressing nicely.
I'm on row 43, which is the furthest I've gotten in any of my attempts. I think I've finally got the hang of the Fisherman's Rib, which is probably helping a great deal.
Of course, now vacation time is over. And, since I'm no longer on the train, my knitting time is a bit curtailed.

De-Trained
With gas prices returning to a reasonable range, Hubby and I reassessed my commute. We determined I'm only saving $20 a month now. So unless I ride the train faithfully every single day, which I don't manage to do, we won't save any money at all.
Remember all that feel good, pro-environment, less-stress stuff I was spouting when I started riding the train?
Forget about it.
Being back on the road is a bit of an adjustment, but considering on many mornings I had to repeat the mantra "Life is better on the train" just to get myself out the door on time, it's an adjustment I'm willing to make.
I told Boss Man about the change and he asked, "What about wear-and-tear on your car?"
And I replied, "Dude, we don't think that far ahead."

Overly Efficient
My missing tea is still missing.
FedEx, there I said it, is so fraking efficient that they delivered my package to a house that doesn't exist.
I was laying low last week because of the holiday, but I called again today and they still have nothing to tell me.
I asked the lady if there is an explanation for this situation. She said it was either delivered or stolen. I again pointed out that it was apparently delivered to a house that doesn't exist. I asked why they knew it was an incorrect address on the Friday, but after I called with the correct address they still delivered it to the incorrect, non-existent address on Saturday.
She didn't have an answer...beyond the driver had three days to follow up and now a claim should be filed.
I'm not sure what I wanted to her to say. I'm not sure how you can explain driving down a street, not seeing the street number, and leaving the package somewhere anyway. But I want some kind of explanation.
Anyway, the good news is when this all blew up last week the shop said they would resend my shipment. Although it hasn't been stated explicitly, and maybe I should ask them to, I imagine I'm not going to be charged for this replacement.
In theory, depending on what kind of mood FedEx is in, I should have my tea by this weekend.
Then I will be able to drink tea I was annoyed about while I work on a poncho that was annoying me.

Feedback Buttons Update
I made some changes to the buttons. I changed the lead in from "How'd I do?" to "Thoughts?".
I changed "entertaining" to "fun," which sort of conveys the same idea (and, sadly, wiped out any "entertaining" clicks I had picked up). I had to shorten it to fit a fourth button.
I added "hug" for those days you feel sorry for me for being so pathetic that I'm getting abused by either my knitting or my dogs. (Happily, we don't have to worry about me being abused by my Hubby—not to make light of a serious situation in some people's lives—because I chose a good one. Samson, however, smacks me in the face on a regular basis. Sometimes we wonder if he is trying to pet us back.)
Hopefully they all show up on your screen. They did at home, but didn't here at the office. I tweaked and they do now. If you aren't seeing all four, let me know and I'll go back to three.
Cheers!

Saturday, November 29, 2008

Petulant Poncho

cable poncho 1 Forget everything I might have told you about the poncho on Thursday or Friday.
It was all lies, anyway.
I wasn't even here.
I wrote those posts Wednesday morning before we left for my in-laws' place in upstate New York.
Obviously I was being a bit optimistic about the whole thing.

On The Road, Again
Samson car 1126 It's a four hour drive. I packed my knitting in the back, which left me twiddling my thumbs for the trip. But I was home from work early Tuesday and spent many hours that night and Wednesday morning working on the evil poncho, so I figured my wrists could use a break.
baru car 1126 (Samson—above—likes being in the car. He much prefers to ride with his head out the window, but it was too cold and he isn't allowed to on the highway anyway. Baru—left—hates being in the car, as you might suspect. Stresses the poor thing out terribly. Thank goodness he out grew getting sick.)

Leave Well Enough Alone
Wednesday night I'm sitting there knitting with my mother-in-law, and I keep finding knit stitches that aren't paired with a YO. As I mentioned on Wednesday, when I encountered these I just worked them in pattern. Well, for some reason I take a closer look.
And I realize that stupid "edge stitch" has been going for a walk.
It's working its way around the poncho and leaving a groove behind it, which is screwing up the pattern.
Of course, things went wrong about 15 rows back (I was on row 38 or so when I noticed) because heaven forbid the mistake be reachable. After all Fisherman's Rib is wicked tricky to rip back because of all that yarn over nonsense.
So I spend an hour picking a few rows out stitch by stitch.
Then I realize that is taking too long. It crosses my mind to leave well enough alone and just keep going, but no. I have to keep trying to "fix" it.
My next attempt was to get a smaller needle tip and cord (I'm using my Denise set at this point) and thread it through the row where things went wrong, much like you would thread a lifeline.
Of course this doesn't work out very well at all, because of all that yarn over nonsense. When I removed the size 8 needles and unraveled the rows I had a mess on my hands composed of loose strands from missed yarn overs.
I spent some more time picking out a few rows stitch by stitch until I finally decided it was a lost cause and just pulled all the way back to the K1,P1 rib.

Maybe Cables are an Option
cable poncho 2 On Thursday I said "screw it."
This was supposed to be a simple pattern I could work on while we were visiting the family. I decided to just work the entire poncho in K1,P1 rib.
That lasted about 8 rows. It occurred to me K1,P1 rib might pull in too much. Who wants a form fitting poncho?
So I switched to reverse stockinette, threw in four six-stitch cables, and maintained the center rib.
Worked about 25 rows when I decided the rev st st didn't do the colors of the yarn justice.
Put the poncho away in disgust and worked on my stealth sock instead.

Back to Square One
We drove home today (Saturday).
My knitting ended up packed within reach in the car.
After sleeping on the situation, I decided to give the Fisherman's Rib one more chance. I'm not letting some stupid pattern get the best of me!
During the four hour trip home I pulled back to the 7 cm point of the K1,P1 rib, marked my center stitches for the increases, and locked down the stupid edge stitch with a marker on one side and my row counter on the other.
I think that has helped quite a bit for keeping track of what is going on.
poncho take 2I'm also remembering to reset the markers for the increases on the next row, so the increases are lining up more attractively.
Every so often I still seem to encounter a random knit stitch lacking a yarn over, but there doesn't seem to be a pattern to it, and I'm making an effort to create a YO, which should prevent any groove from forming. (Why these YOs are missing to begin with is beyond me.)
At press time, I'm on row 25 and things seem to be progressing nicely.
But mark my words, if anything else goes wrong, I'm totally switching to a shawl.

Monday, November 24, 2008

I Learned a New Stitch

solo
Originally uploaded by TravelingAnn

I didn't mean to learn anything new. It just kind of happened.
I blame Cynthia.

Watch as I now skillfully "bury the lead"
My schedule at the store is such that I work either Saturday or Sunday of every weekend. Because of this, and the fact that I have a full-time job, if I swap with any one I end up working a full weekend—which can be tiring.
A few months ago Cynthia asked if I could swap Saturdays with her at the end of October. I believe her goal was to go to Rhinebeck. Shortly before the weekends in question, her husband surprised her with a trip out of town for her birthday. The easiest solution was to ask me to work my normal schedule and get a day in the future.
I agreed, throwing a pout out for good measure. but really it meant more money and I got to skip out on Nov 1, which was the weekend I got back from my trip to Fla.

A present? For me?
So to thank me for working both weekends, and because she is generous like that, she gave me this lovely skein of yarn that caused me to go questing for a new project. solo yarn open It is a skein of Solo from Brooks Farm Yarn in Lancaster, Texas.
She said they are one of her favorites, but she can't carry it at the store because they don't do wholesale. And she remembered that I like red.
I don't know if you can tell, but it has maroon, red, pink, and orange graduations.
It's 400 yards of "100% fine wool." To show you how bad I am at eyeballing yarn, I thought it looked sort of fingering weight, but when I tracked it down on Ravelry it was listed as DK. Sigh.

What to make, what to make
Of course I immediately had to abandon all other projects and figure out what to do with my spiffy new yarn. (I see my WIP list from Ravelry in my sidebar is getting intimidatingly long. I should really change some of them to hibernating status to get them out of there.)
First instinct was socks.
Then I thought fingerless gloves, but at 400 yards they didn't seem big enough.
A scarf would make sense, but scarves bore me and I have plenty already.
Then I thought a shawl. That would be useful and I could keep it at the office for variety.

The Skin Test
Hubby was laughing at me Sunday. It seemed every time he looked at me I was petting, smelling, or rubbing the yarn against my face. Really I was trying to determine whether it was going to make me itch, which would have dictated what I could make with it.
Happily it is very soft and so far itch and tingle free.
So I spent a while on Ravelry looking for one-skein projects and shawls. I understand there is wisdom out there that even if a shawl is written for lace weight you can use a thicker yarn with bigger needles. You just have to be aware the dimensions of your finished project will be different.
However, since I don't do lace or shawls on a regular basis, I'm not sure of this rule in action and didn't want to mess with it too much.

This Is Where I Learn Something
poncho for solo I also flipped through some of my books and magazines and seized on this Cropped Poncho from Rebecca magazine No 32.
The pattern calls for 427 yards. But what's 27 yards between friends? Since it is knit top down, and I'm petite, I figure I can just knit until I run out and I'll be fine.

(A public blog should not be as stream of consciousness as I can get sometimes. Are you surprised I'm a professional writer? Do I need to point out my blog is sans editor or copy editor?)
The pattern stitch is listed as Fisherman's Rib.
I've never worked Fisherman's Rib, but I had a vague understanding it involved a previous row and dropping stitches.
However, the directions were talking about working stitches with a YO and not telling me when to make the YO.
Ack.
An internet search eventually led me to what appears to be a German Blog with pictures and English text directly addressing Fisherman's Rib in the Rebecca magazines.
yippee!
Turns out the stitch is worked differently over there. So I sat with my knitting and worked a few rows.
I didn't like it at first, but it was growing on me.

Over Complicating Things
But I couldn't leave well enough alone.
The stitch is slow to work and I was after something simple for the holiday weekend.
What if I did it in stockinette stitch?
What if I did cables?
So I spent time flipping through stitch dictionaries and doing some preliminary mapping. Even swatched a cable to see how it would look.
Then I asked Hubby's opinion. He thought the rib looked fine.
So I thought, why mess with the poor poncho pattern? I've been wanting to just knit something without having to think too much.
I've decided to just follow the pattern as is.
Well, expect the collar is 20 cm tall, which seems like a lot for me, so I might cut it down to 10 or 15 cm, which should gain me length on the bottom.