Monday, December 21, 2009

Done: Hubby's Striped Sweater

Hubby sweater doneI finished Hubby's Striped Sweater!

Around 8:30 last night.

Which is why there isn't a finished object picture (yet).

He even humored me and posed for pictures. Stood right next to the Christmas tree. Then rejected all the images.

If I used the flash all the colors came out electric (as you've been seeing all along). If I didn't use the flash the image was too dark to see anything.

We decided to wait and take it in the sunshine. But it's Monday morning and there were places to be (for me at least, he's on winter break already).

Hopefully I'll have a picture for you soon. Almost as exciting as it being finished is that it actually fits and looks good. When he first put it on I was flipping out because it looked tight across his shoulders. I mean, he has broad shoulders and all, but I made the size large to take that into account.

After he had it on for about half an hour it suddenly looked better. I suppose the fabric was able to shift around and his body heat blocked it a bit. Because, really, I wove in the last end and he put it on, so it's not like any washing, blocking, or other finessing took place before it hit his body.

Then, when it was time for the photo shoot, he revealed he had it on over a T-shirt (which I knew) AND an undershirt (which I didn't know but should have realized). That was a lot of fabric for the sweater to accommodate.

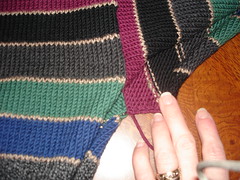
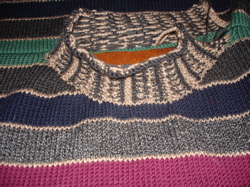
The only snag I hit as I was finishing the sewing was where the collar met the shoulder. There was a gap where the shoulder didn't close and also a big, nasty, loose tan/white stitch from when I picked up for the collar. After I finished sewing the collar shut I used a piece of green yarn (remember the shoulders are green) to do a funky duplicate stitch embroidery train wreck type of maneuver to close the hole and cover the icky stitch.

It seemed to work out well, I might even take a picture for you. Choosing the green was the no-brainer key, since it made it all blend in. Of course no one will ever notice because (and you know what's coming) no one should be close enough to my Hubby's collar to tell.

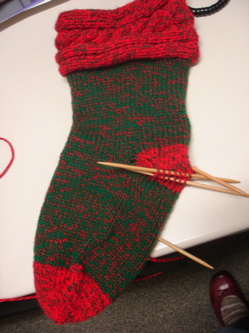
He loves it. (phew, didn't want to have to kill him. The back yard is frozen, there would have been nowhere to hide the body). He said it was nice and soft. He wore it until bed time last night, then he put it on again first thing this morning. He also had on the Yankees Socks I knit him.

He has to do the grocery shopping today. I wonder if he'll wear his new sweater out of the house?

Project Stats
The pattern is #12 Striped Turtle Neck Sweater by Brandon Malby from the 2002 Vogue Knitting Men's Special Issue.

I made two modification: changing the color scheme radically because I used different yarn than specified. Made a mock turtle neck, which is what Hubby wanted, rather than a full-blown, fold-over turtle neck.

Oh, and I worked the collar on the big needles rather than the small needles because I was worried about it being stiff/tight.

US 5 & 2 needles.

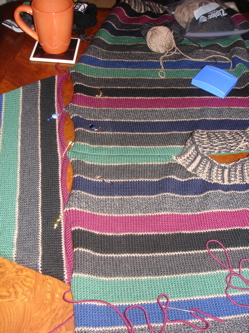
Yarn: Zara and Zara Chine from Filatura Di Crosa 100% merino wool, 136.5 yards each. (The chine are the two tone colors.)
Originally I was going to substitute Zara colors but follow the stripe sequence in the pattern. So I bought two balls of all stripe color and four of the main charcoal color, because the yardage should have worked out since I would be hitting each color as the pattern hit the original colors.

Quantities became a bit of a guessing game once I switched up the stripe sequence and hit some colors more than the original pattern intended. I ended up going back for more on a few, which means I now have some nice Zara colors in stash.

Charcoal was the main stripe color and also appeared in all the ribbing (and I used it for all the sewing). Used: 4.75 skeins. Now stashed: 1
Tan/White was the other color in the ribbing and was also a one row stripe between all the other colors. Used: 3. Now stashed: 1

All the other colors were just used for stripes.

Black Used 1.75. Now stashed: 0.25
Maroon Used: 2. Now stashed: 1
Dark navy: Used: 1.25. Now stashed: 0.75
Green Used: 2
Black/White Used 1.5. Now stashed: 1.5
Royal Used 1. Now stashed: 1

I don't know if that will help you determine quantities if you make this sweater as well.

I think the take away would be to consider both yardage and frequency when substituting yarn in a striped pattern. My main color and a few of my supporting colors showed up with much more often than the original colors in the pattern and it made all the difference in the amounts I needed.

Thursday, December 17, 2009

Done: Christmas Stocking

Yippee!

I finished the Christmas stocking. And well before Christmas, too.

What a relief.

I didn't bother taking a picture since it basically looks the same as yesterday, except without a bunch of dpns sticking out of it.

Project Stats
As I said the other day, the pattern is The 2002 Holiday Stocking from Mary McCall on this page here.
The yarn is "Merry Pop'n Christmas Yarn" in the Christmas Red and Christmas Green colors.
US7 needles.
Looks like I got about 4 sts to the inch.
I worked the green part of the leg for 6 inches from picking up off the cuff to marking for the heel. If I stretch the cuff out, the leg from the top of the cuff to the top of the heel measures 12 inches (give or take).
Then I worked the foot section from the heel for 6 inches before switching to red for the toe.
The entire stocking from the top of the cuff (stretched) to the tip of the toe is about 20 inches.
Looks like the leg has a circumference of about 13 inches.

Which are pretty good stocking dimensions, if you ask me.

The last thing left to do is a hanger loop thingy. But I seem to remember something funky about the loops for the other stockings/mittens. They get hung from the railing on the steps, so I think I've made loops and then we use extra yarn to tie them to the railing. It might be best to make two cords instead.

The point is, I'm going to take the yarn with me and wait to make the loop until I'm up there.

Hubby's Sweater is still in a seamless state.

Wednesday, December 16, 2009

Stocking progress

Stocking almost The stocking is working up rather quickly.

As you can see, I finished the toe the other day and have started on the heel.

What you can't see is that I forgot to pick up extra stitches at the corners of the heel so there are massive gaps there.

Now on one hand I say, "It's a Christmas stocking, nothing is going to be small enough to fall out."

And on the other hand I say, "AAAAHHHH! Look at those massive gaps! How could I let that happen?!"

So I'll probably be going back with some green yarn and attempting to sew the buggers shut.

What you also can't see is a true representation of the colors. I took this one without a flash, but I am in my office so the florescent lights probably aren't helping. The yarn is vibrant, but not as vibrant in the picture. I'm actually wondering whether I should have used the green for the cuff instead. Well too late now.

I'm also thinking that I should have made the green portion of the leg longer. At the time I was thinking the cuff counted as part of the leg length, which made it plenty long. But the visual break because of the color change kind of skews it.

It looks a little more proportional in person. And if I fold it in half at the heel the green leg and foot sections are the same length. So I guess I'm ok.

Once again, too late now.

Hubby's Sweater
Is still crawling along. Even though these side seams are easier to line up, they still take quite a bit of time to execute.

I didn't have any time to work on it Monday night. But I was able to take a whack at it yesterday.

The first side seam is done and I've made a start on the first sleeve.

I am still holding out hope for having it finished by Christmas.

Monday, December 14, 2009

Hubby's Sweater: Breakthrough!

HS side seam I've conquered the sleeves!

They have been beaten into submission!

Perseverance pays off. I am victorious. yippee!

There were a few more missteps along the path, of course. On Friday night someone on Ravelry said she read an idea in a Meg Swanson book to pick-up stitches along the arm hole then Kitchener or three-needle bind off to attach the sleeve.

This sounded brilliant. I ran down stairs to try it out. There are, of course, more rows in the sweater body in the 20 inches the top of the sleeve covered than there are stitches in the sleeve. I couldn't get the correct number of stitches picked up nicely along the body edge.

I struggling with it for about an hour before giving up. Frustrated, I fought the urge to throw the sweater across the room and burst into tears. Instead I complained that I was hungry.

Outside In
I settled myself down, repinned the sleeve, and had my breakthrough.

This time I started at the outside edge, where I wanted the sleeves to end, and worked my way toward the middle from both ends.

I thought of this because I had mentioned the other day that it is the direction I go when I'm attaching a set in sleeve that has shaping.

You might remember in my first attempt to attach the sleeves I started at one end and went straight across. But everything shifted out of place.

Since I own two darning needles (well, ok, four actually) I was able to work from both ends at once. I would work 10 rows (one stripe) on the right, then 10 rows on the left, etc. The whole time I kept smoothing the body down and it was much easier to see where it was buckling up and needing to be "eased in" by taking two stitches on the body instead of just one. In this manner I ended in the middle, at the shoulder seam, and was able to hide any remaining pucker there.

phew!

Of course, that was just one sleeve. The second sleeve I had to once again rip back before I could go forward.

I got the second sleeve finished Sunday evening and plunged right into working on the body.

(I didn't work on it Saturday night. Hubby was out for the evening. I borrowed Love Actually from the library. Even though I'd seen it before I opted to sit and watch it and work on the stocking. The stocking is into the toe shaping. When the toe is finished I just have to go back and do the afterthought heel. I might actually finish this stocking by Christmas! Although I suspect it might be smaller than the other ones I've made.)

The amorphous blob you see at the beginning of the post is the sweater in position to have the first side seem sewn.

I've used a combination of wee, spring loaded, butterfly hair clips and my trusty Lake Placid stitch markers to pin it together. (I'm not sure those hair clips have ever actually touched my hair, but they are awfully handy for seaming a sweater.)

Smooth Sailing
As you might imagine, sewing up the side is much easier. First off, working mattress stitch on two even vertical pieces like this is easy-peasy once you know what you're doing. I like to work a few rows then pull the yarn and watch the work zip into place. whoosh!

On this sweater I have the additional guide of the stripes. If the colors start shifting out of place so the pattern doesn't match up I can see it right away.

I made it all the way up to the second charcoal stripe before I stopped to go to bed. Of course, for this part, I wished it was still the weekend so I could just stay up all night working on the sweater.

Alas, that was not the case. But now that I'm on a roll I might actually have the sweater finished by Christmas too!

Friday, December 11, 2009

Neat-o!

Shameless promotion ahead.

If you have any friends who speak Russian and you want to impress them this Christmas or on their next birthday you should totally check out the greeting cards at Bash Designs, a small company based in California.

There are Russian language and bilingual (Russian/English) cards for Christmas, Birthdays, Names Days, Easter, and Thank You notes.

(Names Days are the feast day of the saint for which you are named.)

These aren't stodgy old cards either. They have cute, stylish designs.

Now, despite how obviously biased my review is, I haven't actually seen these cards in person. But they are being made by my younger cousin, so I know first hand how neurotic, I mean, detail oriented and fashionable she is. So I trust in their quality.

Considering Russian Orthodox Christmas isn't until Jan 7, you probably still have time to order.

What Knitting?
Oh, I'm sorry, those cute cards were supposed to distract you.

Do we really have to discuss Hubby's Sweater? I pulled it out last night, but decided going to bed was a better idea. Hubby was at one end of the dining room table grading papers. I spread out at the other end. He sighed and said, "It will never be done." Boy obviously doesn't realize these things take time. I'm going to conquer this blasted sweater this weekend if it's the only thing I do!

On the other hand, the Christmas stocking is moving along nicely. The entire thing measures 12 inches from the top of the cuff. I'm trying to decide if I can mark for the after thought heel here or if I should work the green part of the leg for a few more inches.

What did me in on the claddagh stocking was that I couldn't get the proportions to look nice, I'd rather avoid that this time round.

Thursday, December 10, 2009

Hubby's Sweater: Square One

Sleeve jog Hubby is a bit distressed at the lack of progress on his sweater.

And believe you me, I'm right there with him.

sigh.

Part of the hold up is that I can't multitask when I'm seaming. When I'm knitting (or crocheting) I can sprawl on the couch and also watch TV with only occasional glaces down at my work. When I'm seaming I have to park myself at the dining room table and give the work my undivided attention. So I can either join Hubby in watching our TV shows or I can work on his sweater. I have not actually laid those choices before him. I wonder which he'd select?

Well, I better get cracking. Last night I told him it would be done by Christmas.

Two Sleeves Forward, One Step Back
I settled down last night to start sewing the sides together.

Things immediately went wrong when I couldn't line up the underarm area. If the points of the sleeves lined up the hem of the body didn't.

uh-oh.

I took a closer look and realized the points of the sleeve didn't land at the same spot on the front and back of the sweater. I tried to get a picture of it, but don't know if you can tell what is going on.

See, on the front of the sweater the sleeve ended on the third row of green. But on the back it ended on the eighth row of green. Which is a five row difference. There was no way to fudge it. If I proceeded, the sleeve seam would run along the side of the arm instead of under it.

This was the case on both sleeves.

I know how it happened. As I was attaching the sleeves the fabric slid and flexed and I just fudged it and kept sewing figuring it would all even out in the end.

I kind of forgot at the time that I was working on a drop-shoulder sweater and the sleeves had to land at the same spot on both sides.

The last few sweaters I made for myself had set in sleeves. Those were easier to fudge because I could see if they were coming out of line and it made more sense were I had to "ease them in."

Hmm, thinking about it, for those sweaters I think I started at each end of the sleeve and worked my way toward the middle, so all slack ended up at the top of the shoulder. On Hubby's Sweater I started at one end and worked straight across.

Take That You Curling Beast!
Sleeve flatWith a heavy heart I ripped the seams out. All my hard work over the weekend destroyed.

Then I dragged the sweater up the spare room, set the iron on wool, cranked the steam valve, and steamed the thing to death.

Yeah, you read that right, I blocked.

I have to imagine that part of the problem last time was that I was fighting the curl and couldn't see what I was doing.

I repinned the sleeves taking care to ensure the ends hit on the same rows this time.

(It was around this time Hubby came wandering in to see what was happening. I'm not sure whether he realized the sleeves were attached earlier in the evening and weren't any longer. I did tell him it was messed up and I had to start over. While I was talking he examined the ribbing, fingered the fabric remorsefully, then sighed and wandered away. That's when I promised it would be done by Christmas. I'm starting to see the wisdom of paying someone to do this bit.)

This time I started in the middle and worked my way toward the ends. My thinking was any slack will get pushed out evenly to the ends and keep the sleeve balanced.

I was able to mostly reattach one sleeve last night before bedtime.

Two issue have presented themselves.
  1. Despite the fact that I'm reusing the piece of yarn from the first time around, it has run short. This is annoying because now I'm going to need two wee lengths to finish off both ends of the sleeve. This means more ends to weave in. grrr
  2. There is a good chance the sleeve is once again going to hit on two different points. It might only be a row or two this time, which might be fine in the end. I'm really annoyed about it since I was being careful and don't know how it happened. I'm also debating whether I can fudge the short end by stretching or scrunching. sigh.
By then it was 10 pm, so I abandoned the sweater and went to bed. Well, not really. I let the dogs out, wrapped up the sweater and stuck it in the dining room credenza to keep it safe, let the dogs back in, then went to bed.

At this point, I think I'll work on the second sleeve tonight and see if I have better luck.

Maybe I should be using more pins.

Tuesday, December 8, 2009

Joining the Fray

Joe's stocking Or is it "joining the frenzy"?

Or even "participating in the panic".

I'm not one for Christmas knitting. This will not come as a surprise to you since I'm not one for gift knitting much. Why should I change my habits just because a certain month rolls around?

However, I've suddenly decided to finally start working on a Christmas stocking for my father-in-law. If that isn't the definition of Christmas knitting I don't know what is.

Have I mentioned the Christmas Stocking saga?
I'm really not sure where to begin.

Ok, I've mentioned that my MIL taught me to knit. She also crochets. (But I think my grandmother taught me that.)

My MIL has/had a collection of Christmas stockings for the nine people who usually attend Christmas at her house. They were made by her mother or grandmother, I don't remember, and are red, white, and green granny squares.

Sure, they've been around a while, but I think her main complaint was they are a bit narrow and long, so it's hard to get presents that fit nicely.

In a fit of newly wed bliss, I crocheted new stockings for me and Hubby.

MIL thought they were grand and somehow got me to agree to make new stockings for the other seven people. Keep in mind this was early in my marriage so I was probably still trying to make a good impression.

The next "stockings" I made were actually giant mittens from a Mary Maxim kit. They are cute and worked up quickly. I got my MIL back on those as I was having trouble seaming them (it was when I'd first started knitting). So I made her sew them shut. Those are for my BIL and SIL.

Then I decided to design a stocking. This is where everything went wrong. I worked a clahhdagh symbol (the heart, hands, crown) in intarsia on the leg. That wasn't too bad. But I couldn't get the proportions of the rest of the stocking to be pleasing. The foot is too short for the leg and the toe is kind of snubbed. It still annoys me, but I was so very sick of it and trying to fix it that I just ended it and moved on. And I was using some old acrylic stuff out of stash and I swear it was squeeking.

That was year before last, I think.

Which makes it about time to make another stocking.

This time I'm being smart and going with a published pattern. The 2002 Holiday Stocking from Mary McCall on this page here. Only it turns out the pattern says "knit to desired length," which returns to the issue I had with my claddagh stocking. But other people on Ravelry put in the dimensions they used, so that will help.

I'm using some Christmas colored yarn that I got as a Christmas present from my Cousin AKM a few years ago. I wasn't sure what to make with it, but it fairly screams Christmas Stocking. In fact, when I went to the attic to dig it out the pattern and both skeins of yarn were sitting together on a shelf.

It's "Merry Pop'n Christmas Yarn." The picture is horrible, but it's bright red yarn with a green strand. The other ball is bright green with a red strand. It's really eye catching. Because the picture is bad you can't tell that it's ribbing with a cable in the middle. That will be joined then the leg will be picked up and worked down.

I'm doing the cuff, heel, and toe in the red and the leg and foot in green.

Let's see if I can get it done by Dec. 24!

Monday, December 7, 2009

Hubby's Sweater: Assembly Required

Assembly The process of seaming Hubby's Striped Sweater has begun.

It's going slowly, but at least it's going.

Hubby's Sweater has been languishing since I finished the actual knitting last week. But isn't that always the way? I knit my Nell Sweater is like two months, but took two years to finish it because of the blasted button band.

There is no button band on Hubby's Sweater, so my excuse is that I was in no condition to mattress stitch because of my head cold.

This was working out rather well for me. I finished the back of my Stella Sweater. I was hanging out on the loveseat Friday night debating binding off the shoulders as instructed or leaving the stitches live for a three-needle bind off later, when Hubby suddenly noticed I was messing with a little light blue thing rather than a big striped thing.

Some adorable, silent pouting ensued.

The result of which you see above. Along with the all important cup of tea.

Simply Sleeves
I spent Saturday night and all of Sunday on and off attaching the sleeves.

I told you it was a slow process.

In fact, seaming sweaters is such a good motivator for me that on Sunday I also cleaned the kitchen, wash a load of towels and two loads of sheets, changed the bed, and vacuumed the whole house.

Just think how much further along I'd be on the sweater if I didn't keep taking breaks to "stretch."

Hubby's sweater is a drop shoulder style, so no shaping to line up.

I folded the sleeve in half to find the center point then pinned it to the shoulder seam.

Then I flattened the sleeve out (yes, I still think blocking is overrated) and pinned the two ends to the body of the sweater. Then I flattened the sweater body and the sleeve and pinned a few more points in between the ends and the center.

The extra pin points help me make sure I'm on track and the sleeve isn't slipping out of alignment. If there is a little slippage I might grab two bars on the sweater body to even it out. If there is a lot of slippage I yank a small section out and try again.

Terribly tedious.

I'm saying "pin" but what I actually used was the stitch markers I made in Lake Placid that have jewelry lobster claw closures instead of rings. Very handy.

For the sleeves I decided to do the seaming with the maroon yarn. I figured it probably wouldn't be visible anyway, but since the sleeves are a solid color the sewing yarn should match. Since the body is striped the sewing yarn isn't going to match all the colors anyway.

For the body I'm going to start the seaming with the left over charcoal grey yarn and moved on to other long scraps from there. I know on the sides the sewing yarn won't show, so I feel pretty safe going with the grey.

I'll just have to be disciplined and work on it a little every night.

Necking, Again
Neckline Just for grins, here is a picture of the collar.

You can see how the fabric is buckling just a wee bit where I picked up stitches.

Huh, that center bit, where it really looks wobbly is where the stitches were cast off so I could pick up 1 for 1. Overall I think I did a good job of picking up evenly.

Anyway, the theory is it will hang flat when he's wearing it.

By the way, everyone who has seen the pictures then seen the sweater in person say the pictures don't do it justice. No prompting required. The colors are much nicer in person. My best guess is the flash keeps activating and that is distorting things.

Thursday, December 3, 2009

Hubby's Sweater: Weaving & Necking

Totally fell off the face of the blog there, didn't I?

First we were out of town for Thanksgiving.

Then I got sick.

Then I got cranky. Why is all the news these days so very gloomy and depressing? Or am I just looking at the world through mud colored glasses?

Anyway.

One thing that is not mud colored is Hubby's Striped Sweater. You can't see this for yourself as I've lost track of the camera. We took it to Thanksgiving (but didn't use it). I think I saw it on the bed in the office this morning....

Because of the lack of photographic evidence you will have to trust me that Hubby's Sweater is rapidly approaching completion. yippee! All the knitting is done. I just have to sew it up. But a head cold is not conducive to putting me in the mood to mattress stitch. Therefore I've shoved it into the dinning room credenza and returned to working on Stella.

The Ends Go In, The Ends Go Out
I took only the sweater to Thanksgiving to force myself to weave in ends during any yarn time I might have had. Weaving the ends was the major obstacle between me and finishing.

On Wednesday night, before I settled down to work, I held the body of the sweater up to my mother-in-law and exclaimed, "Do you see how much I love your son!!" Because she would appreciate how much time a man-sized sweater would take to knit.

She admired my handy work and declared again that I had far surpassed her. Of course, she takes special pride in my abilities since she's the one who taught me to knit. I'm sure she could keep up with me if she applied herself, but she prefers crocheting and is an afghan making machine.

Then on Thursday, after dinner, when everyone else settled down to watch the Giants football game, I parked myself in the recliner in the corner under a floor lap and wove ends for almost the entire game. That's, what, four hours of end weaving? But it was done!

Collared
I made two changes to the collar.

I was supposed to work it on the smaller sized needle, but I was concerned it would be too stiff, so I worked it on the larger needle I used for the body.

It was supposed to be a full turtle neck, but Hubby wants a mock turtle neck, so I cut it short. I worked it for about two inches. I draped the sweater over him and it seems like a good length. I figure I can open the bind off and work a few more rows if it turns out too short once the sweater is all done.

Picking up necklines gives me almost as many conniptions as buttonbands do. But necklines I can conquer.

It took me two tries to get it right. Not counting the half starts when I realized the stitches weren't evenly distributed and I had to start over.

I had worked the neckline decreases one stitch in from the edge. I do that on side shaping as well, since it make it easier to seam if you aren't fighting with lumpy stitches.

On the neck it didn't work out so well. My first attempt at picking up I did under that lone edge stitch. I worked about two rows of the collar and took a look. It was rather stretched and gaping because the single stitch wasn't very stable. Aahhhh!

I tore it out and picked up again, this time going under the second stitch, which is the decreased stitch. I hope it doesn't make the neck to bulky.

After I knit the whole collar I looked at it again and decided it was puckering where I had picked up along the shaped edge of the neckline. I thought my only recourse would be to rip out the collar, rip out the neckline shaping, and rework the neck/shoulder area with the decreases on the first stitch.

Fortunately, before I did anything that rash I took it into Knitting Central for a second opinion. I told the other staff members to be brutally honest.

The Other Ann pointed out that when he's wearing it the slack will be pulled out and the pucker will disappear. C agreed. So I was on my way again.

Now all I have to do is buckle down and seam the sucker.