
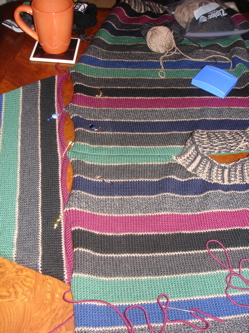
 The process of seaming Hubby's Striped Sweater has begun.
It's going slowly, but at least it's going.
Hubby's Sweater has been languishing since I finished the actual knitting last week. But isn't that always the way? I knit my Nell Sweater is like two months, but took two years to finish it because of the blasted button band.
There is no button band on Hubby's Sweater, so my excuse is that I was in no condition to mattress stitch because of my head cold.
This was working out rather well for me. I finished the back of my Stella Sweater. I was hanging out on the loveseat Friday night debating binding off the shoulders as instructed or leaving the stitches live for a three-needle bind off later, when Hubby suddenly noticed I was messing with a little light blue thing rather than a big striped thing.
Some adorable, silent pouting ensued.
The result of which you see above. Along with the all important cup of tea.
Simply Sleeves
I spent Saturday night and all of Sunday on and off attaching the sleeves.
I told you it was a slow process.
In fact, seaming sweaters is such a good motivator for me that on Sunday I also cleaned the kitchen, wash a load of towels and two loads of sheets, changed the bed, and vacuumed the whole house.
Just think how much further along I'd be on the sweater if I didn't keep taking breaks to "stretch."
Hubby's sweater is a drop shoulder style, so no shaping to line up.
I folded the sleeve in half to find the center point then pinned it to the shoulder seam.
Then I flattened the sleeve out (yes, I still think blocking is overrated) and pinned the two ends to the body of the sweater. Then I flattened the sweater body and the sleeve and pinned a few more points in between the ends and the center.
The extra pin points help me make sure I'm on track and the sleeve isn't slipping out of alignment. If there is a little slippage I might grab two bars on the sweater body to even it out. If there is a lot of slippage I yank a small section out and try again.
Terribly tedious.
I'm saying "pin" but what I actually used was the stitch markers I made in Lake Placid that have jewelry lobster claw closures instead of rings. Very handy.
For the sleeves I decided to do the seaming with the maroon yarn. I figured it probably wouldn't be visible anyway, but since the sleeves are a solid color the sewing yarn should match. Since the body is striped the sewing yarn isn't going to match all the colors anyway.
For the body I'm going to start the seaming with the left over charcoal grey yarn and moved on to other long scraps from there. I know on the sides the sewing yarn won't show, so I feel pretty safe going with the grey.
I'll just have to be disciplined and work on it a little every night.
Necking, Again
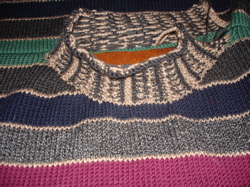 Just for grins, here is a picture of the collar.
You can see how the fabric is buckling just a wee bit where I picked up stitches.
Huh, that center bit, where it really looks wobbly is where the stitches were cast off so I could pick up 1 for 1. Overall I think I did a good job of picking up evenly.
Anyway, the theory is it will hang flat when he's wearing it.
By the way, everyone who has seen the pictures then seen the sweater in person say the pictures don't do it justice. No prompting required. The colors are much nicer in person. My best guess is the flash keeps activating and that is distorting things.
No comments:
Post a Comment