Thursday, January 27, 2011

KFI: Basic Crocheted Fingerless Mitts

Crochet mitt doneWhy should crocheters be excluded from the fun of making and wearing fingerless mitts?

After all, they can fold a square in half and seam it shut just as well as any knitter can. Better, maybe, since crocheting a seam shut is so much easier than mattress stitch.

I would take a moment to mention that I've been crocheting since I was a child. I was so young when I learned that I don't remember being taught! Although I remember my grandmother teaching me the double crochet stitch, which leads me to believe she taught me in the first place.

Anyway, you don't see me crocheting much because extended crochet sessions hurt my wrists. booo! Knitting does not, unless I really, really over do it.

Happily, these little mitts only took a few hours to work up so I think I escaped unscathed.

Sizing
Let's put the sizing discussion up front today, shall we?

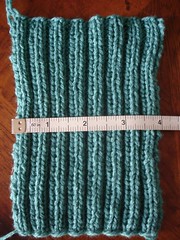
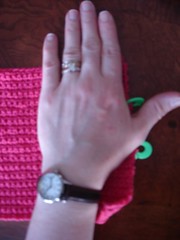
This finished mitt has a circumference of 8". My hand, as we established yesterday, is 7.25" around. That's a lot more ease than I like in my mitts, but if your hands are bigger than mine you might be fine.

Single crochet fabric isn't elastic in the way knit ribbing is. These mitts aren't going to cling for me.

To size for yourself you might want to do a little math. I got a gauge of 4.5 sc per inch. Multiply that by my 7" hand and I get 31.5. So I should have gone with either 31 or 32 sts for fit consistent with what I prefer (i.e., snug).

Clear as mud? Excellent.

Yarn Quantity
Then next thing to consider is that crochet takes 1/3 more yarn than knitting does. While the knit mitts yesterday only took around 11 grams of yarn each, leaving wiggle room for resizing with a single ball, this single mitt took 22 grams out of a 50 gram ball.

These mitts, at these dimensions, will very likely use up the entire ball of yarn. If you will be resizing at all you'll want a second ball. Don't say I didn't warn you.

Let's get down to business! I think this pattern will be suitable for a beginner. You just need to know how to chain, single crochet, and slip stitch.

Actually, the concept is suitable for beginners, hopefully my directions are as well.

Basic Crocheted Fingerless Mitts

Materials: Louisa Harding Kashmir Baby (55% Merino Wool, 35% Microfibre, 10% Cashmere; 143 yards) 1 or 2 balls.
Hook: F/5/3.75 mm (or size necessary to obtain gauge)
Gauge: 4.5 single crochet per inch
Size: Finished mitt is 8" around and 6" long

Note: The mitts as written will very likely use all the yarn. I suggest you divide the ball before starting to ensure you have enough for both mitts, or buy a second ball.

Note: US crochet terms used throughout.

Abbreviations: ch=chain. sc=single crochet

Pattern:
Chain 38
Sc in 2nd chain from hook and in each ch across, turn (36 sc)

Ch 1 (does not count as stitch), working under both loops sc in each sc across, turn.

Repeat this row until piece measures 6" from beginning, or desired length.crochet mitt measuring

Finishing:
Secure last loop, but don't break.

Lay fabric on a flat, firm surface. Lay your hand and wrist on the fabric positioned the way you want the finished mitt to fit. Attach markers above and below your thumb to designate the thumb hole.

Fold fabric in half long-wise. Beginning with last loop, seam the mitt shut by working single crochet down the open long edge to the first thumb hole marker. Break yarn.

Reattach yarn at the other end of the mitt and work single crochet up to the second thumb hole marker. Working through one thickness of fabric, slip stitch up one side of the thumb opening, slip stitch or single crochet across break of first seam, slip stitch down the other side of the thumb opening. Break yarn, weave in ends.

Turn mitt inside out before wearing.
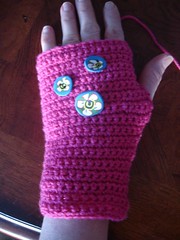
crochet mitt buttons
Embellishing
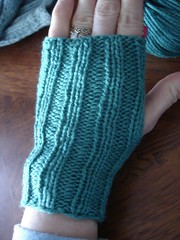
In the pattern I have you work under both loops, which gives you a smooth fabric. Another option is to work under just the back loop, which will give you a little ridge on every other row. Personally, I like the ridge usually, but I wasn't in the mood for it this time.

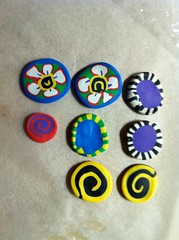
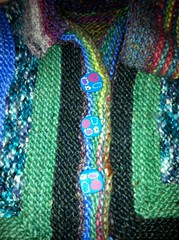
The smooth surface of the fabric lends itself to embellishment. If you are very clever you could embroider flowers or some other design on them. (I am not clever in that way and know it would probably be a train wreck if I attempted it.)

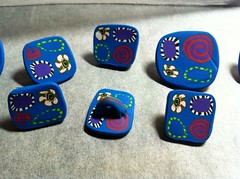
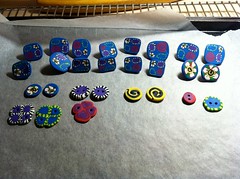
Another option is to attach cute buttons or flower or some such. Really, the possabilities are practically endless.

Wednesday, January 26, 2011

KFI: Basic Ribbed Fingerless Mitts

Knit mitt flat Fingerless mitts are very useful garments.

They are good for wearing indoors in the summer when the air conditioning is a little to enthusiastic and in the winter when the air is nippy because you keep the heat low to save money.

They can also be nice when driving to protect your hands from either a very cold or very hot steering wheel.

An advantage they have over full gloves or mittens is they leave your fingers free for tasks like typing or picking up change.

Fingerless mitts can range from very simple to very complicated, which makes them a good project for all skills levels. They work up quickly since they are small, which makes them a good option for gifts. Their small size also make them a good pallet for testing out new stitches.

But you probably already know or suspect all that. So let's get down to business and magically transform that wee bit of fabric pictured at the top of the post into a mitt.

This pattern is suitable for a beginner who knows how to cast on, knit, purl, cast off, and seam.

Basic Ribbed Fingerless Mitts
Materials: Louisa Harding Kashmir Baby (55% Merino Wool, 35% Microfibre, 10% Cashmere; 143 yards) 1 ball.
Needles: US5 (or size needed to obtain gauge)
Gauge: 8 sts per inch in K2, P2 rib stretched and allowed to snap back [5.5 sts/inch in stockinette]
Size: To fit a hand 7.25" around at the knuckles with zero or negative ease. [See resizing notes at end of pattern]

Note: I suggest you divide the ball of yarn in half before you begin knitting to ensure you have enough for both mitts.

Pattern:
Cast On 33 sts

Row 1: K1, *P2, K2, rep from * across
Row 2: *P2, K2, rep from * across, end P1knit mitt marked

Repeat these two rows until piece measures 6" from cast on edge.
Bind off in rib.

Finishing
Mark for thumb hole: Place the fabric flat on the table. Lay your hand and wrist flat on the fabric so it is lined up in the way the finished mitt with fit. Clip markers above and below your thumb.

Fold fabric in half and seam open long edge using mattress stitch. Break yarn when you reach the first thumb hole marker. Reattach yarn at the second thumb hole marker and finish seaming.

Repeat for the second mitt. Wear with pride while enjoying warm hands.

Resizing
Now you're probably saying to yourself, "Holy Smokes! A little 4" x 6" piece of fabric isn't going to cover my hand." Or maybe, "My hand is much larger than your little, bitty 7" hand. This will never work."
Knit mitt doneWell, don't panic. You can make these mitts with a little extra thought.

My finished mitt took 11 grams out of a 50 gram ball. The pair will take about half a ball. That leaves plenty of yarn for up-sizing.

First, remember that ribbing is very stretchy. My finished mitt has some give to it so it could fit a larger hand. However, if you want to be on the safe side you can add a few more stitches. Add them in groups of 4 to maintain the ribbing. (37, 41, etc.) Also, remember the extra stitch is for the seam so the ribbing will appear continuous.

To make them longer, just keep knitting. I'd suggest knitting an inch more at a time and then measuring your progress by laying your hand on the fabric on a firm, flat surface. Position the top edge so it is under where you want it to be on your fingers and judge the cuff length based on that.

If you do make the mitts wider or longer I suggest you either split the ball before you start knitting OR get a second ball. Consider how much bigger you are going to make yours to help you decide.

Yummy Yarn
I like light weight yarns for my fingerless mitts. I mainly use them for indoor wear so I don't want a lot of bulk hindering my movements.

Louisa Harding Kashmir Baby is a great choice for mitts because it is light weight but warm, soft, and machine washable. As you can imagine, it's easy to get mitts dirty so easy care yarn is important.

This yarn has a chainette construction. Instead of being plied in the traditional manner the strands have been knit into a little tube. It made a nice, springy fabric in the rib stitch. It is also cabling very nicely, but that is for another day.

Saturday, January 22, 2011

Down the Clay Button Rabbit Hole

Buttons closeYou may remember that when I finished my Adult Surprise Jacket I was a little stuck for buttons.

Don't worry if you don't remember it was several months ago.

Anyway. I worked the button holes recommended in the pattern, which are over three or four stitches. At a gauge of 3.5 stitches to the inch they are some big button holes, which means I needed big buttons.

Also, it's such a colorful sweater I knew they'd have to be either really boring buttons to not compete or really fancy buttons to hold their own.

At the time the women in the library knitting group suggested I get some Fimo clay and make my own buttons.

Of course at the time I laughed because I don't do those kinds of crafts. But the idea got into my head and I mulled it over on a regular basis.

Mulling led to watching many videos on YouTube which led to me believing that I could make buttons if I put my mind to it.

By the time I came to that conclusion it was after Michael's had a sale on clay. Not only did I miss the sale but their supplies were pretty devastated.

It wasn't really a problem in the end since I just wanted the primary colors along with black and white. I wasn't looking to make a big investment. After all, I just needed 5 buttons and didn't know if I would be successful or enjoy it.

As a result, instead of buying actual Fimo brand clay I bought the off-brand for $1.29 a block. It seemed to work fine, but since this is the first time I've ever used such a clay I can't really compare.

Plotting
Before plunging in I wisely took the time to consider how I wanted the buttons to look.

This led to perusing Flickr for "fimo buttons" to see what other people had done. There are a lot of pretty buttons out there!

Because of the size of my buttonholes I decided my buttons would have to be around 1" across. I also thought square buttons would be good to echo the angular stripes in the jacket.

I knew wanted some of those classic stripey buttons you see. They seemed attainable because a YouTube video from TheCraftsChannel made them look really easy.

I liked the flowers as well, but they looked harder and I didn't think I felt that ambitious.

Since a template was in order I drew several 1" x 1" squares on a piece of paper and doodled some ideas. Then I finally plunged in.

Stripes!
The first cane I made was the black/white and purple ones. Imagine how pleasantly surprised I was when I cut a few slices off and it actually looked like it was supposed to!

All excited I showed it to Hubby. "Is that how it's supposed to look?" he asked. I confirmed it was. He said he was proud of me.

He's so supportive. Buttons

After making that first cane it was time for dinner and I wasn't able to return to the buttons for a week. It was very annoying.

But then last Saturday I woke up at 3 A.M. and couldn't fall back to sleep. In my sleep deprived state I thought it would be a good time to work on the buttons.

I made the green/yellow and blue cane. Then I made the red/purple swirl. The goal was to use as many of the colors from the jacket in the buttons as I could.

I found that it was easier than I expected, but also took longer.

I didn't invest in tools at all, just used what I had around the house, but I could see how the supplies available at the craft store would have been helpful.

For instance, the stuff I bought is labeled "non-toxic" but I didn't want it on food prep equipment. Therefore, although I was using my normal rolling pin, I was putting the clay between sheets of cling wrap.

Also, I was using a box cutter and a razor blade to do the cutting. The box cutter was fine for trimming, but the striped blocks were often longer than the razor blade forcing me to make two cuts. The people in the videos had long blades that allowed them to slice down on a block in one smooth motion.

Flowers!

Eventually, I started to get sleepy again, but I was on a roll and didn't want to have to clean up and then haul everything out again.

Perhaps because I was sleep deprived I decided to give flowers a whirl. Once again, they were easier than I anticipated.

I'm pleased with them because they are my first attempt, however I learned some things right away.

I should have made the red part of the petals thicker.

I also should have made the notch in the white part of the petal and the purple stripe that filled it deeper.

I am, however, very pleased with my black/yellow center swirl.

Oh, there's another thing, I kept making things scaled down because I didn't want to them to be huge or use up all my clay. Well, bigger is sort of better. I think you could get the details, like the purple stripe in my petals, better if you make them bigger. Then you just roll it down to the size you want. Of course that means more buttons but you don't have to bake them all at once.

A problem I had was consistency in thickness when I rolled the slabs out and when I cut slices. I think you can tell the thick/thin issue in a few of the buttons. Both problems probably stemmed from inexperience.

Buttons on jacketButtons!
Once I finished making the four motifs I packed them together with blue clay, rolled them to smooth things out, then wrapped them.

And immediately realized I should have used a different color core for the green/yellow cane or packed it with a different color. Oh, well, too late by then.

Oh, and another reason bigger would have been better is for size consistence. First I tried to roll the other canes down to the size of the red/purple swirl. Then everything got reduced again once I was shaping the final square button.

Finally the moment of truth came. I sliced up my buttons...and was disappointed.

They were smaller than I wanted and you couldn't see the motifs well.

Since I'd already invested all that time and clay in them I had nothing to loose.

I laid them all between two pieces of cellophane and took the rolling pin to them.

Magically they expanded and the designs were more visible. Huzzah!

After working so hard on the individual motifs I decided I didn't want them obscured by holes and yarn. I rolled up some scraps, sliced it up, and made shanks for the square buttons and the two big flower buttons that were test slices. I made holes in the other test slices since they have blank spots that won't suffer from being obscured.

The square buttons look good on the jacket, if I do say so myself. They aren't all 1". I took the biggest ones for the jacket, but I'm still going to have to sew some of the button holes shut a little. I suppose that is better than having to make them bigger. And I'm totally going to put a smaller one on each pocket...once I knit pockets.

More to come? Finished buttons
I didn't use up all of the canes to make the square buttons. I also didn't use up all the clay in general. I've wrapped it all carefully in cellophane and a Ziplock bag to keep it from drying out.

I think I have enough buttons for now, but I'm prepared if I get the bug again.

You will not be surprised to hear that I'm trying to figure out ways to put buttons on everything now.

I'm going to make another hot water bottle cover (oh, I never told you about the first one) and I'm going to put buttons on it.

And I'm trying to figure out how to work buttons into the next Schleppy Sweater I knit.

Seriously, I created a (controllable) monster.

Tuesday, January 18, 2011

Bias-V Progress

Bias V progress It took me a few days to recover from the chaos of the stripes colliding with the shaping.

I resorted to building a massive chart of the entire sweater in Excel to see how it would all work together.

Yes, that took an hour or two.

Why the entire sweater? Because I thought it would be easier to have the stripes progress up the chart and seeing where the colors end up rather than trying to start at the armholes and having to determine the color placement from the sweater.

The chart turned out to be a good idea not only for the stripes but also for the neck shaping.

Despite having reworked the numbers for the v-neck shaping I rebelled against the new figures and was going to go with my original math.

However, when I plotted it on the chart I saw that it did indeed not work. The neck shaping stopped at a point beyond the end of the shoulder shaping. There was a distinct lack of stitches where stitches needed to be for both sets of shaping to happen.

It was a simple matter of flipping the page over to get to the new neck numbers. I plotted them with a red boarder so I could really see the difference. I also had to replot the shoulders since they were based on the top of the v-neck. I was able to cross-reference the revised chart rows with the number of rows I had predicted for the armholes in my original round of number crunching.

I'm pretty sure everything is happy now, but the real test will be when the sweater is done.

The result of plotting the stripes was that I decided to maintain the charcoal grey on left shoulder even though it's only going to be three stitches. I like having the colors continue.

I was also able to see that the dark blue was not going to jump across the gap and eat the black/white yarn until all the way up at the shoulder.

What I did was box out the shape of the sweater, then copy paste the colors up to the neck shaping.

Then when I got to the neck shaping I used a lighter version of all the colors to plot them across empty space. This allowed me to follow their natural progression. Also, it gave me a chart of the back of the sweater.

After all that work I realized there was something I could have done to make my charting life easier.

I made the chart by copying each individual color two rows at a time, moving my cursor up and over, and pasting.

The next day, after I was all done, I realized I could have copied the two rows all the way across the sweater. The relation of the colors to each other would have been maintained just as well.

sigh.

Monday, January 17, 2011

Pockets?

I want to put pockets on my Adult Surprise Jacket.

In the pattern EZ says not to try to position them in advance.

She suggests putting on the finished jacket, noting where your hands naturally want to go, and placing the pocket in that location.

Now that I finally have buttons (a whole other saga. Oh there have been things to blog about, I just haven't been blogging) I can get a better idea of how the jacket actually hangs.

I put it on, buttoned it up, and pretended to put my iPhone in my non-existent pocket.

Then I froze and attached stitch markers to either side.

I spent the next hour walking around trying to spontaneously put things in my pretend pockets.

I'm not sure how much I actually managed to surprise myself, but the positioning seemed to work.

Now I have to take some measurements to make sure they match in distance from the front opening and bottom hem. I might also make them just a twinge wider.

Cutting?!
I'm a little worried about the idea of cutting the sweater to make the pockets.

Pam asked why I'm going to cut if I'm scared of the idea.

I pointed out that if I don't cut I'll have to do patch pockets. Now I suppose patch pockets would work for some people. But in my matchy-matchy world they won't work.

I'm out of most of the yarns I used to knit the sweater so I can't reproduce the stripes.

And, let's be serious, the jacket is eye-catching enough as it is without patch pockets adding to the visual interest.

Tuesday, January 4, 2011

Return of the Bias Striped V-Neck Shell

Bias V shaping I recently finished a cabled hat for Hubby. I designed it, so it was no small feat. There was a lot of reworking involved. I'll tell you all the gory details in a future post, hopefully after I have the pattern written up.

I bring the hat up because it was one of those projects that left me...unsettled?...feeling at a loose end?...those phrases are a little too negative for what I'm trying to describe. I can't think of the right word at the moment, but I'm sure you felt it too.

I finished the hat and had to cleanse my knitting palate. I had to take time and savor the accomplishment of finishing the hat. I wanted to knit, but nothing I had in progress seemed appealing. What I really wanted to do was cast on for something new with some of my Rhinebeck yarn, but that would have been irresponsible.

Since I wanted my hands to be moving, but didn't want anything taxing, I fished out the Bias Striped V-Neck Shell.

Yeah, Stockinette
This is a little top I'm designing fro myself using yarn leftover from the striped sweater I made Hubby last year. I was very excited when I started it, but hit a major wall after I took that design class with Shirley Paden in July and she declared that my v-neck shaping numbers wouldn't work. Oh, and moving didn't help the situation either.

Anyway. I hauled it out and discovered that I had reworked the neck shaping numbers at some point. Also, I could still understand the pattern I'd written for myself, which was very exciting. After a quick measure to check the length I was able to jump right back into knitting it.

Boo, Fancy Stripes
However things got ugly pretty quickly.

As you can see the stripes march across the sweater to the left. On each right side row I work one more stitch in the color to the right maintaining the stitch count. So, to clarify, each color has 13 stitches (although one has 15 because the math didn't work). The light green eats the dark blue which eats the black/white and on across the sweater. As the color drops off the left I attach it to the right and continue the pattern.

This was working out very nicely, expect I didn't plan for how the armhole and neck shaping would affect the pattern. Actually I probably figured I deal with it when I got there.

Well, I'm there and I'm stuck.

As you can see in the picture the stripes already when squirrley because of the armholes. This is actually attempt number two. For my first attempt I continued the grey on the right but it ended up with only like three or four stitches between casting off the armholes and having to add in the tan/white when it dropped off the left.

(Also my pattern said to decrease two stitches each side but I bound them off and didn't end up liking how that looked. Frogging was necessitated by the double whammy of ugly shaping and bad stripes.)

On this second attempt I abandonded the grey when it was down to two stitches. It's alittle abrut, but I tell myself it's OK becuase it's under my arm. No one should be close enough to notice.

Now my problem is the chaos the neck shaping is causing. Between the neck shaping and the slide of the colors the black/white yarn in the center is rapidly disappearing. The dark blue already ate one side. Technically on the next right side row I work the dark blue is going to jump the gap. At this rate the black/white is going to get cut off in the middle of the row!

Since I'm using leftover yarn I made a lot of decisions based on conservation. I thought I'd be clever and start with the front so that if I ran out of colors it would be on the back and maybe less noticible. The v-neck was also an attempt to save yarn (less territory to cover). My ability to make sleeves will be dictated by how much yarn is left after the body is done.

I'm debating not letting the dark blue jump the gap yet. Give the black/white a chance to get ahead. But I don't know if that will distort the stripes. After all, the dark blue is being encroched upon by the green as well as the neck shaping.

Now I wish I had knit the back first so I would have complete stripes to refrence. I would have been able to plot the flow of the colors on the front against the colors on the back and decide how to work the slide.

Lightbulb!
Seriously. As I was just sitting here typing this post it occured to me to work up a chart with the colors. Brilliant! It won't be easy because of the shift, but I can color it all in then slice out the neck.

Excellent. This should fix the problem and is easier than knitting and ripping.

I know what I'll be doing tonight.

Monday, January 3, 2011

2011: The Year of the Sweater

Bias V shapingMy resolution this year is to be more organized.

Might as well set my sights high!

Part of my new organized lifestyle will be blogging regularly again. One could say the year is off to a bad start since it's already Jan 3, however I don't usually blog on the weekends so I gave myself a pass.

At the end of last year my grand plan was to blog in the morning as a way to get the creative juices flowing. We all know how well that worked out. Now my plan is to blog after lunch, like I used to. We'll see how that goes.

Enough babble, on to the yarn and knitting content!

Needs Must as the Needles Drive

I own a lot of yarn.

Not as much as some people. My yarn collection doesn't take up an entire room in the house, but it is getting a bit tight in the dining room credenza.

This would not have been an issue when we lived in Connecticut, since that was a three bedroom house with a 1/2 finished basement and a walk up attic. It is an issue here in New Hampshire since we're in a spacious one bedroom apartment.

I've owned some of this yarn for a while now and feel bad that it's being ignored. I also own some very lovely stuff that I'd like to knit already.

In this hoard of mine I have yarn to make several sweaters. These quantities of yarn were generally bought with a project in mind.

Since sweaters take quite a bit of yarn, I figure if I set myself the task of knitting some of these long coveted sweaters I'll make a serious dent in my hoard.HVBS 1

Based on previous sweaters it takes me between one and two months to knit a sweater if I stay focused. If I work through my list it should carry me through the year nicely.

In no order the sweaters I have on tap are:
  1. My Celtic Critter Cardigan
  2. Hubby's Vertical Box Stitch Sweater
  3. Finishing my Bias-V Neck Sweater
  4. Aunt Kim's Vines and Lace Sweater
  5. Brother's Ruben
  6. My Cap Sleeve Cabled Sweater
  7. My Rainbow Schleppy Sweater
  8. My Sherbert Schleppy Sweater
  9. Red Top-Down Cardigan from KFI samples
Not Sweaters Exclusively
When I like a yarn I won't randomly buy several thousand yarns for a patternless sweater I might make someday, instead I'll try to buy a sock yarn equivalent. The result being that I have quite a hoard of sock yarn in addition to my sweater hoard.

So although I say this is The Year of the Sweater I'll be knitting other things as well. Primarily I have a number of UFO WIPs I have to finish. Some socks, a pair of fingerless mitts, a scarf. It would be nice to finish those things up.

Also, I got a hot water bottle for Christmas. I asked for one so I could knit it a cover. This morning I finally cast on for one.

I know I usually advocate project monogamy, but I'll have to be good about having a project rotation this year if I'm going to accomplish everything I want to.

The important thing to remember in all this is to be relaxed about the situation. Knitting should be fun and should not add stress to my life. I have a goal, and a list, but it's all for guidance. None of it is required.

What goals are you setting yourself?