
 Returning to the idea of a blog as being as much a journal of what I've learned for my own reference as it is a public exhibition for the amusement of others, I shall tell you about the second half of the Shirley Paden Design class at Westport Yarns last night.
In the last class she walked us through designing the sweater body and the sleeve up to the cap shaping.
In this class she picked up more or less where she left off. We reviewed a double-taper body style with a discussion of fudging the decrease or increase start and finish points to make them land on appropriate parts of the sweater.
Being Sneaky
Having explained a crew neckline in the last class, she attempted to explain a V-neck this time.
I say attempted because we were all a bit math challenged. It's pretty simple math, but we all sat there and said, "Huh?" I put it down to end-of-day brain fatigue.
The way she runs the class is to give you sample gauge and measurements, then walks you through crunching the numbers to calculate stitch and row counts. Obviously she has the answers so she knows what is supposed to happen.
When we all came up short on her sample V-neck numbers she said, "Ok, let's try a different one, give me some numbers."
Since everyone else was sitting there paralyzed with math-fear, I started calling out the numbers for my Bias Striped V-Neck Shell. Now, if you remember, I had a devil of a time figuring this out because no formula I had access to seemed to work. I already suspect I'd done it wrong and her example reinforced that suspicion. Here was an opportunity to have someone do the math for me!
Well, Shirley got two steps into it and immediately said it wouldn't work. She didn't even bother writing all the calculations out. She said there were too many stitches for too few rows. Huh. So right there I learned something valuable. She said I would have to do a deeper plunge. By then people were a little energized, so they gave some alternate measurements for us to work.
Cross Back
Unfortunately I can't actually use the new numbers we came up with in class.
During the last class Shirley had said not to include ease in the cross-back measurement. She said that shoulder seam should be accurate to the body for the sweater to look good.
I did not know this when I originally designed the Bias-V, so I had included 2" of ease in the cross-back to match the 2" of ease in the bust. Meaning I have to redo the entire top of the sweater.
This shouldn't be too painful as it should only be around two stitches each side.
Cap It
After we got past the neck shaping we moved onto the sleeve cap shaping. Lynn and I were really looking forward to learning it.
I had attempted to follow the book, but it boggled my little mind. Which, apparently, isn't hard to do. Frankly, the first time Shirley explained it was still like, "Huh?" But after she reviewed all the steps, and handed out the answer sheet, it started making sense. You figured out the bottom, which matches the armholes on the sweater, then the top, and decrease away whatever is left in the middle.
It's just getting to that middle that's the mind bending part.
I shouldn't have to worry about it for a while though, which might be a shame on some level since I won't get to practice.
The Bias-V is slated to be sleeveless until I know how much yarn I have. I'm not going to design sleeves until I know I can knit sleeves.
I thought I'd be applying this new sleeve cap knowledge to the Celtic Critter Cardigan, but it's not looking that way now.
Swoon! A Consultation!
An important part of the class is a "private" consultation with Shirley if you are far enough along in your pattern.
I say "private" because it's right there in front of everyone, but she's focused on you for the moment.
Anyway. I got to the store early since I'd gone straight from work. She also arrived about half an hour before class started, so I took the opportunity to show her my numerous, large swatches.
She said they were very nice. She might have even used the word beautiful.
I asked her about the cross-back measurement and if the no ease thing holds true since I'm designing a coat to go over other clothes. She said it does since that part of the sweater fits (rests on the body) differently than the bust area does.
Right there I have to rework my numbers.
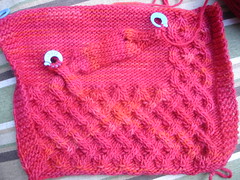
I told her about the stitch count exploding because of the cable style I'm using. I said my current numbers call for 17 stitches on each shoulder but my cable needs 16. She suggested I do a drop shoulder or modified drop shoulder instead, which will get around the need to shape the area. I would still decrease stitches under the arm, and still have to rework the top in general, but I might get a bit more wiggle room.
She also questioned why I have two purl stitches between the border and the cable. I was like, "They are in the pattern." She was like, "Pifff! The pattern is just a starting point."
Of course, that would mean I have to swatch again to make sure I like how it looks.
Show Off
A few other people had projects that needed a consultation at the end of the class. There was a pretty mesh dress and a top with a lace hem.
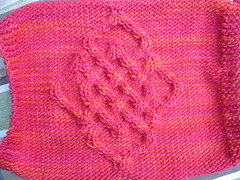
Then Shirley told me to haul out my swatches again. Everyone crowded around and admired them and I got to explain all about the sweater concept.
Their eyes bugged a bit when they saw the number and size of swatches I had made. "I'm just going to sew them together and call it a day," I assured them, to general amusement.
A few people questioned if the center back motif was going to be big enough. Even though it is 5" by 6" it doesn't look that big in isolation. However, they weren't taking into account how petite I am. When I held it up to my back they agreed it would be just fine.
Other suggestions were made for adding cables or motifs to other area. I've taken them under consideration, but won't really know how it will all fit together until I start knitting.
Now I just have to get through a little more math then I can plunge in.
No comments:
Post a Comment