
 You may remember that when I finished my Adult Surprise Jacket I was a little stuck for buttons.
Don't worry if you don't remember it was several months ago.
Anyway. I worked the button holes recommended in the pattern, which are over three or four stitches. At a gauge of 3.5 stitches to the inch they are some big button holes, which means I needed big buttons.
Also, it's such a colorful sweater I knew they'd have to be either really boring buttons to not compete or really fancy buttons to hold their own.
At the time the women in the library knitting group suggested I get some Fimo clay and make my own buttons.
Of course at the time I laughed because I don't do those kinds of crafts. But the idea got into my head and I mulled it over on a regular basis.
Mulling led to watching many videos on YouTube which led to me believing that I could make buttons if I put my mind to it.
By the time I came to that conclusion it was after Michael's had a sale on clay. Not only did I miss the sale but their supplies were pretty devastated.
It wasn't really a problem in the end since I just wanted the primary colors along with black and white. I wasn't looking to make a big investment. After all, I just needed 5 buttons and didn't know if I would be successful or enjoy it.
As a result, instead of buying actual Fimo brand clay I bought the off-brand for $1.29 a block. It seemed to work fine, but since this is the first time I've ever used such a clay I can't really compare.
Plotting
Before plunging in I wisely took the time to consider how I wanted the buttons to look.
This led to perusing Flickr for "fimo buttons" to see what other people had done. There are a lot of pretty buttons out there!
Because of the size of my buttonholes I decided my buttons would have to be around 1" across. I also thought square buttons would be good to echo the angular stripes in the jacket.
I knew wanted some of those classic stripey buttons you see. They seemed attainable because a YouTube video from TheCraftsChannel made them look really easy.
I liked the flowers as well, but they looked harder and I didn't think I felt that ambitious.
Since a template was in order I drew several 1" x 1" squares on a piece of paper and doodled some ideas. Then I finally plunged in.
Stripes!
The first cane I made was the black/white and purple ones. Imagine how pleasantly surprised I was when I cut a few slices off and it actually looked like it was supposed to!
All excited I showed it to Hubby. "Is that how it's supposed to look?" he asked. I confirmed it was. He said he was proud of me.
He's so supportive.
After making that first cane it was time for dinner and I wasn't able to return to the buttons for a week. It was very annoying.
But then last Saturday I woke up at 3 A.M. and couldn't fall back to sleep. In my sleep deprived state I thought it would be a good time to work on the buttons.
I made the green/yellow and blue cane. Then I made the red/purple swirl. The goal was to use as many of the colors from the jacket in the buttons as I could.
I found that it was easier than I expected, but also took longer.
I didn't invest in tools at all, just used what I had around the house, but I could see how the supplies available at the craft store would have been helpful.
For instance, the stuff I bought is labeled "non-toxic" but I didn't want it on food prep equipment. Therefore, although I was using my normal rolling pin, I was putting the clay between sheets of cling wrap.
Also, I was using a box cutter and a razor blade to do the cutting. The box cutter was fine for trimming, but the striped blocks were often longer than the razor blade forcing me to make two cuts. The people in the videos had long blades that allowed them to slice down on a block in one smooth motion.
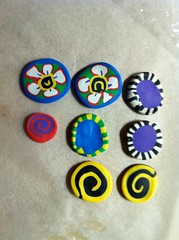
Flowers!
Eventually, I started to get sleepy again, but I was on a roll and didn't want to have to clean up and then haul everything out again.
Perhaps because I was sleep deprived I decided to give flowers a whirl. Once again, they were easier than I anticipated.
I'm pleased with them because they are my first attempt, however I learned some things right away.
I should have made the red part of the petals thicker.
I also should have made the notch in the white part of the petal and the purple stripe that filled it deeper.
I am, however, very pleased with my black/yellow center swirl.
Oh, there's another thing, I kept making things scaled down because I didn't want to them to be huge or use up all my clay. Well, bigger is sort of better. I think you could get the details, like the purple stripe in my petals, better if you make them bigger. Then you just roll it down to the size you want. Of course that means more buttons but you don't have to bake them all at once.
A problem I had was consistency in thickness when I rolled the slabs out and when I cut slices. I think you can tell the thick/thin issue in a few of the buttons. Both problems probably stemmed from inexperience.
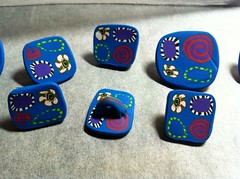
 Buttons!
Once I finished making the four motifs I packed them together with blue clay, rolled them to smooth things out, then wrapped them.
And immediately realized I should have used a different color core for the green/yellow cane or packed it with a different color. Oh, well, too late by then.
Oh, and another reason bigger would have been better is for size consistence. First I tried to roll the other canes down to the size of the red/purple swirl. Then everything got reduced again once I was shaping the final square button.
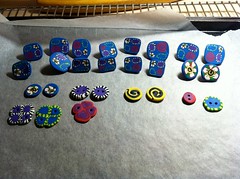
Finally the moment of truth came. I sliced up my buttons...and was disappointed.
They were smaller than I wanted and you couldn't see the motifs well.
Since I'd already invested all that time and clay in them I had nothing to loose.
I laid them all between two pieces of cellophane and took the rolling pin to them.
Magically they expanded and the designs were more visible. Huzzah!
After working so hard on the individual motifs I decided I didn't want them obscured by holes and yarn. I rolled up some scraps, sliced it up, and made shanks for the square buttons and the two big flower buttons that were test slices. I made holes in the other test slices since they have blank spots that won't suffer from being obscured.
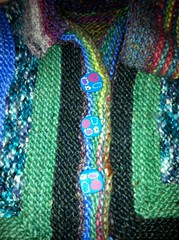
The square buttons look good on the jacket, if I do say so myself. They aren't all 1". I took the biggest ones for the jacket, but I'm still going to have to sew some of the button holes shut a little. I suppose that is better than having to make them bigger. And I'm totally going to put a smaller one on each pocket...once I knit pockets.
More to come?
I didn't use up all of the canes to make the square buttons. I also didn't use up all the clay in general. I've wrapped it all carefully in cellophane and a Ziplock bag to keep it from drying out.
I think I have enough buttons for now, but I'm prepared if I get the bug again.
You will not be surprised to hear that I'm trying to figure out ways to put buttons on everything now.
I'm going to make another hot water bottle cover (oh, I never told you about the first one) and I'm going to put buttons on it.
And I'm trying to figure out how to work buttons into the next Schleppy Sweater I knit.
Seriously, I created a (controllable) monster.
Wow, They're beautiful!!!! I guess those people who can do artsy things can do artsy things and "dem dat can't" just eat their hearts out!!!! Of whom I am one!!!!
ReplyDeleteAwesome job girl! Those came out great!!
ReplyDeleteLove the buttons. You rock Ann!!!
ReplyDelete