
 Fingerless mitts are very useful garments.
They are good for wearing indoors in the summer when the air conditioning is a little to enthusiastic and in the winter when the air is nippy because you keep the heat low to save money.
They can also be nice when driving to protect your hands from either a very cold or very hot steering wheel.
An advantage they have over full gloves or mittens is they leave your fingers free for tasks like typing or picking up change.
Fingerless mitts can range from very simple to very complicated, which makes them a good project for all skills levels. They work up quickly since they are small, which makes them a good option for gifts. Their small size also make them a good pallet for testing out new stitches.
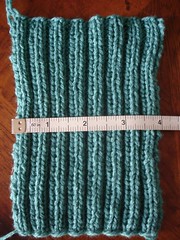
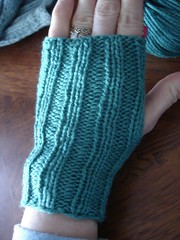
But you probably already know or suspect all that. So let's get down to business and magically transform that wee bit of fabric pictured at the top of the post into a mitt.
This pattern is suitable for a beginner who knows how to cast on, knit, purl, cast off, and seam.
Basic Ribbed Fingerless Mitts
Materials: Louisa Harding Kashmir Baby (55% Merino Wool, 35% Microfibre, 10% Cashmere; 143 yards) 1 ball.
Needles: US5 (or size needed to obtain gauge)
Gauge: 8 sts per inch in K2, P2 rib stretched and allowed to snap back [5.5 sts/inch in stockinette]
Size: To fit a hand 7.25" around at the knuckles with zero or negative ease. [See resizing notes at end of pattern]
Note: I suggest you divide the ball of yarn in half before you begin knitting to ensure you have enough for both mitts.
Pattern:
Cast On 33 sts
Row 1: K1, *P2, K2, rep from * across
Row 2: *P2, K2, rep from * across, end P1

Repeat these two rows until piece measures 6" from cast on edge.
Bind off in rib.
Finishing
Mark for thumb hole: Place the fabric flat on the table. Lay your hand and wrist flat on the fabric so it is lined up in the way the finished mitt with fit. Clip markers above and below your thumb.
Fold fabric in half and seam open long edge using mattress stitch. Break yarn when you reach the first thumb hole marker. Reattach yarn at the second thumb hole marker and finish seaming.
Repeat for the second mitt. Wear with pride while enjoying warm hands.
Resizing
Now you're probably saying to yourself, "Holy Smokes! A little 4" x 6" piece of fabric isn't going to cover my hand." Or maybe, "My hand is much larger than your little, bitty 7" hand. This will never work."
 Well, don't panic. You can make these mitts with a little extra thought.
My finished mitt took 11 grams out of a 50 gram ball. The pair will take about half a ball. That leaves plenty of yarn for up-sizing.
First, remember that ribbing is very stretchy. My finished mitt has some give to it so it could fit a larger hand. However, if you want to be on the safe side you can add a few more stitches. Add them in groups of 4 to maintain the ribbing. (37, 41, etc.) Also, remember the extra stitch is for the seam so the ribbing will appear continuous.
To make them longer, just keep knitting. I'd suggest knitting an inch more at a time and then measuring your progress by laying your hand on the fabric on a firm, flat surface. Position the top edge so it is under where you want it to be on your fingers and judge the cuff length based on that.
If you do make the mitts wider or longer I suggest you either split the ball before you start knitting OR get a second ball. Consider how much bigger you are going to make yours to help you decide.
Yummy Yarn
I like light weight yarns for my fingerless mitts. I mainly use them for indoor wear so I don't want a lot of bulk hindering my movements.
Louisa Harding Kashmir Baby is a great choice for mitts because it is light weight but warm, soft, and machine washable. As you can imagine, it's easy to get mitts dirty so easy care yarn is important.
This yarn has a chainette construction. Instead of being plied in the traditional manner the strands have been knit into a little tube. It made a nice, springy fabric in the rib stitch. It is also cabling very nicely, but that is for another day.
I have some yarn that i just cant seen to find a home for ...Now i think i have.Thank you for the idea.
ReplyDelete