It would appear that in my effort to have a healthier lifestyle by exercising regularly I strained or sprained something.
Oddly, Hubby is suffering from a similar pain. Although we are pretty sure they are exercise induced injuries we haven't ruled out the possibility of alien abduction.
Anyway, it would further appear that this injury is being aggravated by my knitting.
I think the original injury actually happened a week or so ago. Of course I've been dealing with it in the classic and illogical method of ignoring it and hoping it will go away.
But I can ignore it no longer. I have come to my senses and acknowledged that if I want it to heal I'll have to rest it. A little rest now will prevent longer knitting downtime later. Hopefully. Shame I didn't have that attitude when it first happened.
I know that posts whining about ill healthy and injuries aren't the most fun to read. I've even seen survey results where people say they move on and might not come back to blogs that have them regularly. Unless that's the point of the blog, I suppose.
Anyway, this is knitting/crocheting related.
Mainly to say that I won't be doing any for a least a week, if I can stand it for that long, to allow this issue to resolve itself.
Also to remind us all to stop, rest, and stretch. Even if we aren't the Bionic Woman (or Million Dollar Man) it's important to remember that our bodies are marvels of technology that require proper care.
I find this hiatus a little ironic while I'm in the middle of attempting a blogging revival. Hard to blog about knitting and/or crocheting if you aren't actually doing any.
It will be an interesting challenge to see if I can milk the projects I completed during the blog blackout for at least a week while I heal.
Of course, if you've spent any time reading my blog, or flipped through past entries, I'm sure you are familiar with my ability to provide such excruciating detail about the most insignificant event that it turns into an epic post. Therefore neither of us is at all worried about my ability to post during this dry spell.
I have warned Hubby about my fiber hiatus. He expressed sympathy that my oowie has progressed to such a degree that such extreme measures have to be taken.
I don't, however, think he has realized my yarn hiatus could result in mood swings, fidgeting, anxiety, and other symptoms that will generally make everyone unhappy. On the other hand, he might just think I have PMS.
In order to support my effort not to knit for the week I have pushed all my current projects to the edges of the room so they are out of sight and hard to reach.
I think I'll feel it most in the evenings when I'm watching TV. I don't know how I'll sit there, still, for hours on end...I might actually have to fold laundry...or go to bed early.
Monday, February 28, 2011
Sunday, February 27, 2011
Sock Triumph
Ta-da!
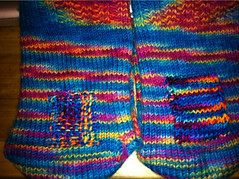
You knew, of course, that I wouldn't leave well enough alone. On the left you see a sock repaired by traditional darning. On the right is a sock repaired by knitting a patch.
I couldn't bring myself to throw them away, but keeping holey socks around would have been silly. And my knitting schedule is so overbook at the moment that tossing aside all my other projects to knit new legs up from the existing foot seemed a little extreme.
Another motivation was that "these" are some of my favorite socks. Might that explain the holes? I still blame the snow boots.
If you ask me what my favorite sock yarn is, I'll probably have a done answers and reasons. But if you look at the socks I've actually knit, as opposed to yarn in my hoard, six pairs have been from Jitterbug yarn. That is counting counting a pair I knit for Hubby and the two pairs of scrappy, ruffled, ankle socks I made myself.
Acquiring Knowledge
Having made up my mind that I would darn the socks I did what any knitter would do in this modern age.
I went to Ravelry and did a search on "darn." People use it as a mild exclamation rather regularly in the Ravelry forums. Then I targeted the "Sock Knitters Anonymous" group and search on "repairs."
That led me to a thread about darning socks and an old Knitty article about reinforcing socks that included darning at the end.
I looked at the pictures on Knitty and said, "Huh?"
Then I did a general Google search on "darning socks" and the top two hits were for YouTube videos. The first one was for darning in the traditional method. It was clear, but I wondered if there had to be a method more in keeping with my skill set, i.e., knitting.
I didn't see why I couldn't pick up stitches below the hole, knit a little piece of fabric, and Kitchener the top down. I thought it would be good if I could attach it on the sides as I went along.
The second video Google offered up was actually a series of 6 that covered making repairs by duplicate stitch and by knitting a patch, which was just what I was after.
Patched
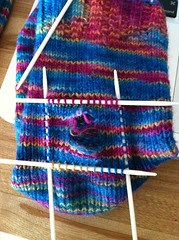
I plunged in and it wasn't too bad.
The method used knitting skills/techniques I employ on a regular basis. The first step was picking up one leg of each stitch along the bottom of the hole. Then picking up the ladders between stitches in a column on either side of the hole a few stitches away so you are in a stable area.
In the video she just free handed the Kitchener stitch at the top row, but I thought it would be easier to target it if I picked up those stitches as well.
Then I just knit a little stockinette stitch flap. Turns out marking my top row was a little too clever. The flap had more height than I anticipated so when I grafted to my selected row the patch was baggy. I had to pull that out and see where the patch wanted to end.
The result is a covered hole, but I wasn't too thrilled with the results. The sides where I either knit two or purled two together to connect the flap to the sock are a bit of a train wreck. I suppose that would improve with practice.
But my real complaint is that it strikes me as baggy. I don't know if that is because of me, or the method. I used US2 needles, which is what I knit the socks in. Maybe I should have gone down to US1. On the other hand, you don't remove the damaged fabric from underneath, so there are two layers there. Now, in theory (and I think they said this on the video), the two layers will eventually felt together, but for now it annoys me that there is a floppy bit there.
Also, despite being knit and despite using the same yarn, I think the patch is pretty obvious. Now this is probably because I used sparkling new yarn on a sock that has seen around four years of use. Some fading is to be expected, but I think the slight bagginess of the patch makes it thick and obvious as well.
Darned
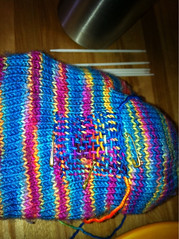
My dissatisfaction with the patch drove me to attempt a traditional darn.
I started out by marking my target rows with wee safety pins. Then I plunged in. I reeled out a nice long piece of yarn. One of my worries about this method was not knowing how much yarn it would use and I didn't want tons of ends to weave in.
In the video, the people went horizontal then vertical and they were done. The Knitty article mentioned a third pass.
I did the first two passes, once horizontally, then turned the sock sideways and wove "vertically" crossing my strands from the first pass. Every so often as I worked I would give the sock a tug against the strands I was weaving in order to introduce some slack and reduce any pulling on the side anchor stitches.
You can't tell very well in that picture, but the area over the hole is kind of thin. Lots of air and light were still getting through.
I decided to ad-lib and made a diagonal pass, but it didn't look good at all, so I pulled it out.
I ended up turning the sock again to the 6 o'clock position (I'd already done 12 and 3) and making another horizontal pass. It looked pretty good, but I figured I'd gone that far I might as well complete the circuit, so I turned the sock to 9 o'clock and did another vertical pass.
The four pass darn is what you see in the very first picture. Now, of course, by the third and fourth pass things were becoming obscured so really I was just picking up any strand I could grab, but the hole was filled in and that is all that matters.
I think I'm more pleased with the traditional darn.
As you can imagine, it is a bit thicker and firmer than the original sock fabric, but not terribly so. Also, I think it blends in a little better, despite the brighter yarn. I suppose that is because some of the old, faded yarn is showing through.
But most of all it feels more stable. Since it was accomplished by weaving in and out of the original sock fabric there isn't a goofy loose bit on the inside. Everything is held together securely. I like that. I don't have to worry about extra fabric inside the patch doing strange things.
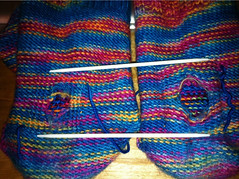
This last picture shows the inside of the repaired socks. The darned one is on the left and the knit patched one is on the right. As you can see, there are still a few loose strands on the inside of the darned sock, but far fewer than on the patched sock.
Well, I'm glad I finally attempted this technique. It not only adds to my knitting knowledge, but saves my socks.
However, you won't be surprised to hear that I hope I don't have to apply these skills again any time soon.
Labels:
Jitterbug yarn,
repairs,
socks
Saturday, February 26, 2011
Sock Tragedy
Yesterday evening I discovered this horrible situation.
It's a shocking and graphic image, and I apologize for any discomfort it may cause you. But we all have to face the fact that it could happen eventually to any one of us.
Holes!
Holes in our hand knit socks! aaaaahhhhh!
As you can see they are in the back of the leg, just above the start of the heel flap. It strikes me as a strange place to get holes in your socks.
Yesterday I wore these socks in my big Sorrel snow boots when I walked to the library for the Friday knitting group.
No one else was there, by the way, probably because of the horrible weather. Of course two out of the three librarians knit, so they stopped by and chatted. The library in general was pretty deserted, which made it really, really quiet, even for a library. I'm not accustomed to knitting in such silence. At home I knit while watching TV. If I'm knitting out and about I'm usually with other knitters.
Every Sock Matters
Anyway, back to my poor socks.
When I discovered the tragedy at then end of the evening I showed them to Hubby while making little whimpering noises and blamed my boots.
He said he thought the yarn was just worn away and the boots were probably the final blow. Then it's possible he said something exceedingly absurd along the lines of "You have other pairs."
Yes, and you have a lot of bottles of wine, but it's not like you wouldn't be upset if one fell and broke. Of course, since I was grieving last night his ridiculous comment didn't really register.
A Good Run
Hubby's comment about the fabric simply being worn away made me wonder just how old these socks are. Happily, I was able to look them up in my Ravelry notebook.
According to my notes I made them in 2007. It must have been early 2007 because they appear to predate both my Ravelry account (Dec 2007) and my blog (Sept 2007).
I seem to remember having entered all my pre-Ravelry socks into my notebook at one point so I could track the colors.
Anyway. That means the socks are about four years old, which is a pretty good run, I suppose.
On the other hand, my first socks, which I made using Regia, still seem to be going strong. And they are from around 2003. I guess that bit of nylon really does make a difference in durability.
Darn It?
I'm in a quandary about how to proceed with the poor blue Jitterbug socks.
If they were store bought socks I'd throw them away without a second thought.
However, despite owning 23 other pairs of hand knit socks and Hubby's implied suggestion to the contrary, I can't dispose of a pair of hand knit socks!
At the deepest part it looks like I've lost 5 or 6 stitches and about 6 rows.
Part of me says this might be a good opportunity to learn to darn. Although the need to build a little grid to work over sounds like a pain.
Part of me says to snip the yarn below the hole, cut out the bad parts, and reknit the leg up. It might end up a wee bit shorter but that shouldn't be a problem. However, I'm not sure about the integrity of the heel flap, so I might fix the leg to only end up with a hole in the heel flap down the road.
What I can't do is open the toe, frog them entirely, and reknit them. The soles are just a wee bit felted so I know they wouldn't frog. No, any repairs will have to take place above the gusset.
Wish me luck.
Labels:
Jitterbug yarn,
repairs,
socks
Sunday, February 20, 2011
Hubby's Sweater Update
After all that big talk in the blog post on Wendesay I came down with a bad head on Thursday. Spending most of the day hiding under the covers is not condusive to blogging, or many other activities come to think of it.
Then Friday I was feeling better but was busy catching up from Thursday.
Regardless, I'm here now.
Let's go with Hubby's Vertical Stripe Box Stitch Sweater as today's focus project.
How We Got To This Point
At the beginning of the fall Hubby declared he was ready for me to make him another sweater. This time he wanted vertical stripes because they are slimming.
I quailed inside because vertical stripes are a challenge to knit, but what Hubby wants Hubby gets.
Now his announcement may sound obnoxious, but it's not if you think about it. I don't bother wasting my time knitting for him until he has made one of these declarations. Well, except for socks. I knit those for him randomly and he only has after purchase approval rights on the yarn. If he doesn't like the yarn I keep it for myself. Socks are small and harmless so I feel safe being bold with them.
Hats, scarves, and sweaters require a larger investment of time and should be approached with caution.
When I first learned to knit I made Hubby a hat, which he promptly rejected for various valid reasons (unrelated to my skill, it was a perfectly fine hat). That was all I needed to lay low and wait for him to request things.
In fact the rejection of that first hat made me rather surprised when he requested a hat at the beginning of the winter. But he had input this time and has worn this new hat everytime he's gone skiing, which has been almost every day.
The problem with waiting for declarations is that once they are made communication breaks down. Although very fashionable, Hubby doesn't "speak yarn" and mostly knows what he likes when he sees it.
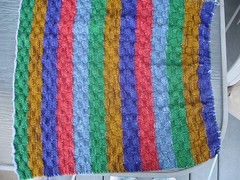
So vertical stripes was a good start. And I know he likes colorful (really, he wants something in tweed yarn, but I haven't found one I like that would be good for an entire sweater). The box stitch came about when he got into my stash and found some swatches.
Sideways
I was going to knit the stripes bottom up using intarsia style twisting on the wrong side, but it didn't look very good. Instead I'm going sideways. I'm knitting in the normal direction, cutting the yarn after every 12 row stripe repeat but when I'm done I'll turn it on its side.
Things were progressing nicely until I had worked my way through all the stripes I thought I would need. Despite my calculations that 13 stripes would be 25" wide my piece kept measuring 23" wide. This was not going to be wide enough.
I kept checking the math and measuring the piece and the numbers didn't change. Finally I rechecked my gauge and sure enough I was getting about 7 rows per inch instead of the 6 rows per inch I got in my swatch. sigh.
I went ahead and knit the next color in the sequence and it seems to be the right width now. phew.
I started with the back, since it wouldn't have neck shaping or anything. Now I'm working on the front. I'll be able to measure the back piece and use it as a guide for which rows should include the neck shaping on the front. I'm doing a drop shoulder style so I don't have to worry about armhole shaping.
Of course I'm being clever, because I never learn. I started both pieces with a provisional cast on and left the other end of the back live. My plan is to graft the side seams using kitchener stitch. It seemed to me that trying to seam over the cast on and cast off edges would be too difficult. The shoulder seams are, of course, going to be sewn especially since they are the side of the work and there was no way to leave it live. I was also clever on the side edges and worked the first and last stitches in garter stitch as a selvedge.
I'm hoping this makes the shoulders easier to seam. On the bottom edge I'm going to use those stitches to pick up and knit down for the ribbing.
Far From Over
There was a while when the back seemed to be taking a long time to knit. Then suddenly it was done.
Hopefully the front won't take long.
But I don't anticipate finishing the sweater quickly, mainly because I'm stumped about the sleeves.
It would be easiest to just do them in horizontal stripes, but I don't know if that will clash with the vertical stripes of the body.
I've been mulling the sleeves over in my mind and can't decide how I would work them in vertical stripes and accomplish shaping. My current brilliant idea was be to start provisionally in the center and work out toward the end decreasing by shortening each row. Then go back and work the other end out.
That might be easier than trying to start at the side of the cuff, increase up to the center, and decrease down again.
Maybe when I get to the sleeves I'll knit a swatch and explain the stripe directions to Hubby.
He'll be the one wearing it, after all.
Wednesday, February 16, 2011
Sweeping Update
Oh, there has been plenty to blog about, I just haven't been blogging.
I really need to be sure to make time for it. I mean, I like blogging. It's another creative outlet. I just have to make time for it in a way that won't be stressful.
Really, if I'm blogging for myself to keep a record of my projects it's important for me to do it. On the other hand, if I'm doing it for myself it's also ok if I don't.
Anyway.
Judging by my Ravelry notebook I've finished seven projects about which I haven't blogged one word. So I'll have to weigh the benefits of going back and writing about them after the fact.
Actually, if I'm going to once again swear I'll start blogging more regularly I'll need those finished projects as fodder because goodness knows my current active projects are booooring.
Well, they are at boring points for blog content but are still fine for knitting.
But then considering I can foment paragraphs of anxiety over the most minute details, I guess I don't really have a lack of blog content if I put my mind to it.
Some Substance?
I hadn't actually planned for this post to be all stuff, nonsense, and angst.
When last you heard from me, more or less, I'd declared 2011 the Year of the Sweater. I'm still adhering to that declaration, more or less. As you can imagine, my seven finished projects are not sweaters. Ha! I wish.
No, in between my sweater WIPs I've tossed off a few smaller projects.
The sweaters endure.
In fact, at the beginnig of the year I got a little overwhelmed with all the works-in-progress I had. I was beginning to feel like I was spinning my knitting wheels since I had so many projects on the go and nothing finished to show for my efforts.
I have frequently extolled the virtues of project monogamy. I've clearly seen that working on one project at a time results in actual finished objects in a relatively quick time frame. However, I can't stick with it.
One project isn't enough. On the other hand seven or so projects is too much. Especially if more than one of them is a sweater. Talk about not seeing the light at the end of the tunnel.
To free myself from the anxiety of so many WIPs I went through my Ravelry notebook and shifted many into "hibernating" status. If you use Ravelry you know this shifts them from the top row of your project page to the bottom row. Out of sight, out of mind.
At the same time I wrapped (most) of those now hibernating WIPs up and put them away. I say most because the Bias Striped V-Neck is in limbo. It's hibernating on Ravelry but still on the bookshelf in the living room because of the over crowded conditions in the dining room credenza.
The result is that my "only" active projects are Hubby's Vertical Stripe Box Stitch Sweater, a Green Schleppy Sweater in KFI sample yarns, and the Lace 101 scarf in gift Hand Maiden Camelspun yarn that I work on at the Library Knitting group.
This has been working out well. Until I hit stupid walls on both active sweaters the other day. Happily I was able to just reach over and grab the Bias-V for some emergency knitting. It's a good thing I didn't pack it away after all.
Jumpstart
A girl can only dream that this post will get me started blogging again. I've given myself plenty of jumping off points for a post tomorrow.
I can blog about one of the active sweaters.
Or I can blog about one of the many projects I finished during the recent blog blackout.
I just have to stratagize about how I want to approach all these topics.
For now, I think the best course of action will be to take the pups out and go to bed.
Labels:
misc
Subscribe to:
Posts (Atom)