
 Ta-da!
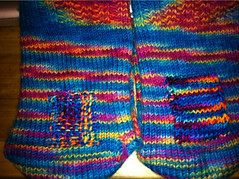
You knew, of course, that I wouldn't leave well enough alone. On the left you see a sock repaired by traditional darning. On the right is a sock repaired by knitting a patch.
I couldn't bring myself to throw them away, but keeping holey socks around would have been silly. And my knitting schedule is so overbook at the moment that tossing aside all my other projects to knit new legs up from the existing foot seemed a little extreme.
Another motivation was that "these" are some of my favorite socks. Might that explain the holes? I still blame the snow boots.
If you ask me what my favorite sock yarn is, I'll probably have a done answers and reasons. But if you look at the socks I've actually knit, as opposed to yarn in my hoard, six pairs have been from Jitterbug yarn. That is counting counting a pair I knit for Hubby and the two pairs of scrappy, ruffled, ankle socks I made myself.
Acquiring Knowledge
Having made up my mind that I would darn the socks I did what any knitter would do in this modern age.
I went to Ravelry and did a search on "darn." People use it as a mild exclamation rather regularly in the Ravelry forums. Then I targeted the "Sock Knitters Anonymous" group and search on "repairs."
That led me to a thread about darning socks and an old Knitty article about reinforcing socks that included darning at the end.
I looked at the pictures on Knitty and said, "Huh?"
Then I did a general Google search on "darning socks" and the top two hits were for YouTube videos. The first one was for darning in the traditional method. It was clear, but I wondered if there had to be a method more in keeping with my skill set, i.e., knitting.
I didn't see why I couldn't pick up stitches below the hole, knit a little piece of fabric, and Kitchener the top down. I thought it would be good if I could attach it on the sides as I went along.
The second video Google offered up was actually a series of 6 that covered making repairs by duplicate stitch and by knitting a patch, which was just what I was after.
Patched
 I plunged in and it wasn't too bad.
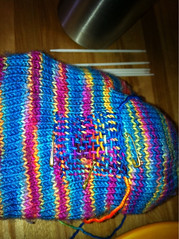
The method used knitting skills/techniques I employ on a regular basis. The first step was picking up one leg of each stitch along the bottom of the hole. Then picking up the ladders between stitches in a column on either side of the hole a few stitches away so you are in a stable area.
In the video she just free handed the Kitchener stitch at the top row, but I thought it would be easier to target it if I picked up those stitches as well.
Then I just knit a little stockinette stitch flap. Turns out marking my top row was a little too clever. The flap had more height than I anticipated so when I grafted to my selected row the patch was baggy. I had to pull that out and see where the patch wanted to end.
The result is a covered hole, but I wasn't too thrilled with the results. The sides where I either knit two or purled two together to connect the flap to the sock are a bit of a train wreck. I suppose that would improve with practice.
But my real complaint is that it strikes me as baggy. I don't know if that is because of me, or the method. I used US2 needles, which is what I knit the socks in. Maybe I should have gone down to US1. On the other hand, you don't remove the damaged fabric from underneath, so there are two layers there. Now, in theory (and I think they said this on the video), the two layers will eventually felt together, but for now it annoys me that there is a floppy bit there.
Also, despite being knit and despite using the same yarn, I think the patch is pretty obvious. Now this is probably because I used sparkling new yarn on a sock that has seen around four years of use. Some fading is to be expected, but I think the slight bagginess of the patch makes it thick and obvious as well.
Darned
 My dissatisfaction with the patch drove me to attempt a traditional darn.
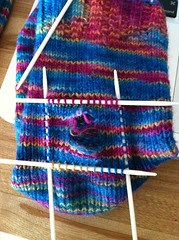
I started out by marking my target rows with wee safety pins. Then I plunged in. I reeled out a nice long piece of yarn. One of my worries about this method was not knowing how much yarn it would use and I didn't want tons of ends to weave in.
In the video, the people went horizontal then vertical and they were done. The Knitty article mentioned a third pass.
I did the first two passes, once horizontally, then turned the sock sideways and wove "vertically" crossing my strands from the first pass. Every so often as I worked I would give the sock a tug against the strands I was weaving in order to introduce some slack and reduce any pulling on the side anchor stitches.
You can't tell very well in that picture, but the area over the hole is kind of thin. Lots of air and light were still getting through.
I decided to ad-lib and made a diagonal pass, but it didn't look good at all, so I pulled it out.
I ended up turning the sock again to the 6 o'clock position (I'd already done 12 and 3) and making another horizontal pass. It looked pretty good, but I figured I'd gone that far I might as well complete the circuit, so I turned the sock to 9 o'clock and did another vertical pass.
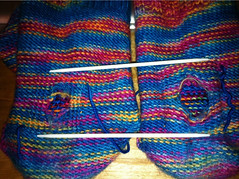
The four pass darn is what you see in the very first picture. Now, of course, by the third and fourth pass things were becoming obscured so really I was just picking up any strand I could grab, but the hole was filled in and that is all that matters.
I think I'm more pleased with the traditional darn.
As you can imagine, it is a bit thicker and firmer than the original sock fabric, but not terribly so. Also, I think it blends in a little better, despite the brighter yarn. I suppose that is because some of the old, faded yarn is showing through.
But most of all it feels more stable. Since it was accomplished by weaving in and out of the original sock fabric there isn't a goofy loose bit on the inside. Everything is held together securely. I like that. I don't have to worry about extra fabric inside the patch doing strange things.
 This last picture shows the inside of the repaired socks. The darned one is on the left and the knit patched one is on the right. As you can see, there are still a few loose strands on the inside of the darned sock, but far fewer than on the patched sock.
Well, I'm glad I finally attempted this technique. It not only adds to my knitting knowledge, but saves my socks.
However, you won't be surprised to hear that I hope I don't have to apply these skills again any time soon.
No comments:
Post a Comment