Saturday, April 30, 2011

Darned Socks

Darned slipper heels After the success of darning the blue Jitterbug socks I turned my attention to other sock repairs.

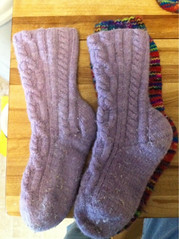
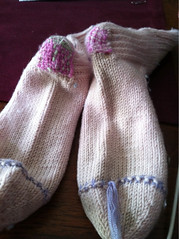
I made these pink socks in, oh, 2007 during a Nancy Bush class at . Since it was a one day class we used DK weight yarn in order to have our projects move along quickly and cover the sections we needed to in the allotted time. The problem is, in my opinion, DK weight socks are too thick for wearing with shoes.

Since I didn't want to waste a perfectly good pair of socks I started wearing them around the house as slippers.

Well, that didn't last long. The soft yarn, Zara, wasn't up to that sort of abuse and the heels quickly blew out. At that time I was not motivated enough to learn to darn.

But now that I know it is much less harmless than anticipated I fished these slipper socks out. The irony of repairing them with the same yarn that quickly died is not lost on me.

Of course, after I fixed the heels I was happily wearing them again, only to hook the bottom of the toe of one on the edge of my nightstand and rip open the cute little braid. That is the trailing yarn you see on the right hand sock.

Not even sure where to start with that so I might just pull the ends inside and weave them in.

Ounce of Prevention
With the death and repair of the blue Jitterbug socks I thought it wise to examine my other Jitterbug socks for signs of weakness. The red ones look fine but I found a thin spot on the purple ones.

The weird thing is only one sock has a thin spot. The other sock looks fine. I didn't bother to take pictures because they weren't very exciting.

In this case I took all the pithy sayings about not procrastinating firmly in hand and worked a duplicate stitch darn on the thin spot before it progressed to an actual hole. I guess I'll have to keep an eye on the second sock to see if it thins out too.

A Pound of Cure
Exploded heel 
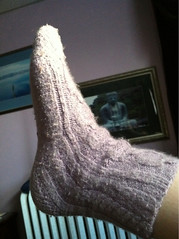
Turns out March was a bad place to be a sock in my house.

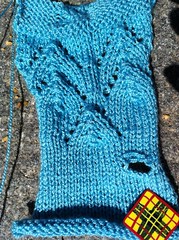
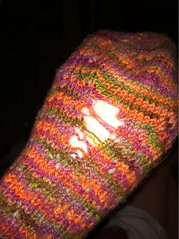
This is a bad close up of the heel of one of my Joy of Charlene socks. It's upside down, i.e., the cuff is going down my arm and the foot is at the top of the picture.

I took these socks on our trip to Utah. When I put them on something didn't feel right and I looked down to discover this massive blow out. Needless to say I took them back off and didn't wear them.

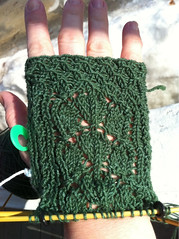
These socks have a lace and rib pattern and I think the hole started in one of the eyelets which just ran for the hills when it broke free.

The lesson I have learned is not to place eyelets at the top of the heel flap.

Despite the fact that I never use an entire ball of yarn on my socks because I have small feet I was concerned that I wouldn't be able to repair these with the actual yarn. In 2009 I got to clever for my own good and made a pair of socks using leftover yarn from these and the purple Jitterbug socks.

I was sure I'd have to repair them with purple yarn, but then stumbled across a small amount of the Sol Joy in the project bag of another WIP which I'd apparently been using for a provisional cast on.

Darned heel
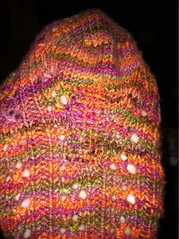
I worked a traditional darn but it was a little tricky because of the pattern. I wasn't concerned about obscuring the pattern. The issue was a lack of fabric to grab onto because of the eyelets. Also, these socks have a Cuban Heel and I think that unusual shape influcenced things as well.

In the end I got the hole closed up. Three passes seemed enough to close it up.

The second sock of this pair had not yet developed a hole, but I thought it was better to be safe than sorry and worked a traditional darn over the area at the top of the heel just to firm things up.

The repairs to the purple and orange socks took around 2 hours. I can safely say that because before I started I put the Simon Pegg movie "Hot Fuzz" into the DVD player for a little background noise.

Still, it was worth it to be able to return these socks to circulation. However, I hope my other socks stay stable for a while. Knitting is much more fun than darning!

Thursday, April 28, 2011

Poor Socks

Shrunk socks Hubby and I ran off to Park City, Utah, for a week over March break. I did not mention it because it was during my blogless time. The only hint of it you had was the picture of the stitch markers I made when we got home.

While we were gone my mom came up to puppy sit, as she does. This was a much bigger deal since we live eight hours away now instead of just 3.5 or 4 hours. We were very appreciative of her doing this because we didn't have to kennel the poor pups.

While she was here she got a little bored, which is understandable, and kindly did some laundry for me.

My Girlfriend's Cable Socks survived being washed, but slipped through into the dryer. Where they promptly shrank.

On the bright side the red Jitterbug socks did not pay a visit to the dryer.

Anyway. As soon as I saw them I knew something was wrong and as soon as she answered the phone mom knew why I was calling and confessed everything.

Soaking socks Not want to just toss them, I made a rescue attempt.

Someone on Ravelry had a war-time solution: "Dissolve 3 oz epsom salts in boiling water; add sufficient cold water to cool and the make the solution up to
about 2 gallons. Soak garment for 2 hrs., then pull it into shape, squeeze gently and dry."

Well, I didn't want 2 gallons of liquid, so I used a smidge of epson salt in 2 Quarts instead. Then I forgot about them so instead of soaking for 2 hours I ended up soaking for 2 Days. oops.

Much stretching and cussing ensued. In the end I managed to jam my feet back into them. I let them air dry for a day but noticed they were starting to shrivel up again so I jammed them on and wore them to bed while they were the littlest bit damp.
Saved socks For that week I was able to wear them around the house as slipper socks.

That can be hazardous to a pair of socks health, but I figured they are kind of half out the door as it.

I was feeling pretty pleased about having rescued them. Until this past weekend.

After wearing them for a week I felt obliged to wash them.

Cold water, gentle cycle, air dry all as usual.

They shrank down again. Can't get them on my feet.

It didn't occur to me they would revert so I had not manipulated them while they were damp.

It's very sad. I don't think I have the energy to go through the effort to revive them again.

Tuesday, April 26, 2011

Messed up those sleeves

Hmmm, I don't know how to rotate a picture I uploaded using the mobile app.

Oh well, you get the idea that it's an in-progress sweater body and sleeves.

Wow, those colors are not accurate at all. That's what happens when you take pictures at night.

Two mistakes have been made on the sleeves, which might tempt you to say is proof I have a lot to learn from the Master Knitters program. However, these mistakes are more from lack of planning and inattention rather then lack of skills.

I'm following my Schleppy Sweater pattern. I found coordinating green yarns all in the same weight (DK).

The body was worked in stripes of 15 rows each. I stopped the body at the underarms and then started working on the sleeves.

The 15 row stripes continued on the sleeves and that is where things went wrong. You see that both the body and the sleeves are not at the same yarn. The problem is the sleeves should be 16.5" long and are currently only 12.5" long.

I suppose this means I should have worked wider stripes on the sleeves. Or narrower so I could move through the sequence more quickly.

Either way, you won't be surprised to read that I'm not going to rip them out and rework them.

No, I think I'll restart the stripes. I'll work 15 rows, or as many as I can, with the cuff yarn, then more stripes in the faux Fair Isle. That should bring me to about the correct length. After that I might work a few rows in the yarn to match the body just because I can.

In the end I suppose it will be fine.

The second mistake I made is less noticeable. I placed stitch markers to designate where the increases for the sleeves will be. Instead of keeping the increases lined up in the center of the sleeve around the end of the round I kept working them inside the stitch markers. This caused the increases to continually shift out around the sleeves.

Ooops.

Well, the increases are mostly on the bottom of the sleeve, i.e., on the under arm. So, once again, I'm not ripping out!

Monday, April 25, 2011

Leveling Up

Oh, what have I gotten myself into now?

In a moment of insanity recently I signed up for the Master Hand Knitter Program from TKGA.

If you aren't familiar with it, the program is a correspondence course that helps you improve your knitting skills. After completing all three levels you get bragging rights, a pin, and a certification you can put on your resume if you're in the business.

For each level you have to knit several swatches, a project, answer some questions, and write a report. Then you send it all away to the review committee and they either pass you or give you constructive criticism suggestions on where to improve.

Harmless, right?

Sure, if you're going off my description. If you check out the details on the TKGA website you'll see that I'm totally downplaying it.

People agonize over this program. You have a year to complete each level and many people take that long or longer.

So why am I doing this to myself?

I'm not entirely sure. I had considered signing up for it a year or two ago but chickened out. It's not the knitting that worries me, it's the reports. Which is silly since I write for a living. I totally know how to write a research paper. But, bleh.

Now suddenly I've taken the plunge. I told Hubby about it and he thought it sounded very cool and encouraged me to go for it. Of course, he also asked if I get to put it on my resume as a professional development thing. To which I responded, "Hell, yes, I'm putting it on my resume!"

On Saturday I got to hang out with my friend Pam and her sister Nancy and they basically expressed the opinions that I was insane and why was I putting myself through it?

I explained that I want to re-engage with my knitting in a new way. Oh, sure, I'm still knitting and thinking about knitting, but I've realized I'm not relating to it in the same way since we moved over the summer. This has been reflected in my lack of blogging.

I think there are a few factors at work (aside from me still developing a work from home routine). The first is my wonderful lack of commute. I would use that soul sucking time in the car to compose my blog posts in my head and otherwise think about my current project. No commute equals reduced pondering time.

The second, and perhaps bigger one, is no longer working at a local yarn store on weekends. When I was at Knitting Central and then Westport Yarns I was constantly surrounded by other knitters and crocheters, talking about their projects, thinking about projects, etc. Even if I wasn't actively taking a class at the store, you can't help but learn things and pick tips up in a situation like that.

Now, as when I first learned to knit, I'm back to stitching in isolation. Well, that's not entirely true. I have the Library Knitting group on Fridays, but we tend to chat more about life than our projects.

Anyway, I've come to the realization that I have to make an effort to learn things and challenge myself now. And also to get back to thinking critically about my knitting and crocheting in a way that will make me want to write about it.

Being Serious
Thinking critically will be a key to my success. I'm going to have to work hard to remember not to dismiss the lower levels as skills I've already conquered. I mean, I'm starting out with knitting garter stitch and stockinette stitch swatches. yawn! But at the same time I know that my edge stitches aren't always the best, and my transition stitches around cables can be a little loose.

Still, at Level 2 you have to knit an argyle sock and helloooo I've already knit two pairs after designing my own charts. Granted, on one the lines didn't cross properly, but I corrected that on the second pair. That's the kind of thing I'll be strugging with.

Oh, and another thing, the website says you'll learn to write patterns. Yeah, well, I've had patterns published in books, soooo, right.

However, I know there is a lot about knitting that I still need to learn. There are things that I know how to do but not why they are done a certian way. I'm sure there are tricks I'll pick up in the research that I might not have encountered because I'll probably be reading varoius books that I wouldn't otherwise read.

Actually, I think that's a total bonus part of the program. I'm going to have an excuse to buy a bunch of books I've been waffling about owning because I'll need them to research the short answer and essay questions.

So far I've enjoyed buying the supplies for the notebook. Office supply stores are fun.

And I stopped at The Elegant Ewe on my way home Saturday to get some smooth, cream colored wool for my swatches. As well as B, D, and E crochet hooks! When I told the nice lady at the store I'd signed up for the Master Knitter program she congratulated me, but also looked at me as if I was a little crazy. She said another customer just finished Level 3 and made a beautiful sweater. There was admiration in her voice for crazy knitters like us, but she also asked why.

If I keep telling people I want to challenge myself, eventually I'll start believing it, too.

Progress? Oh, aside from making my binder all I've managed to do is read the directions and make myself light headed.

I did say I have a year, right?

Thursday, April 21, 2011

KFI: Findley! Yummy new yarn

Findley pile This blog post is mean on so many levels.

First this yarn I'm in love with won't be in stores until the Fall 2011.

Second none of the colors I have are going to be available in stores. However, the 12 colors that will be available are just as stunning.

Best.Job.Ever.
Perhaps you have heard of Juniper Moon Farm. Susan Gibbs did what many knitters and crocheters dream about. She quite her desk job and started raising sheep.

Instead of the resulting wool being spun and sold to yarn stores for years she sold it directly to people. You can buy a CSA which entitles you to a portion of the wool production while Susan and her team takes care of all the messy, hands on business.

Pretty exclusive stuff.

Now a different door to her creative sensibilities has been opened. She has teamed with Knitting Fever Inc. to design a new yarn line that is spun and dyed in Italy. Her little flock of sheep could not grown enough wool to meet the demand of nationwide distribution, so they had to call in reinforcements.

The new line is also called Juniper Moon Farm and is starting with three yarns: Willa is a bulky 60% Merino, 40% Super Fine Kid Mohair blend, Chadwick is a worsted weight 60% Merino Wool/40% Baby Alpaca blend, and Findley is a lace weight 50% Silk, 50% merino blend.

Tanis Grey, formerly of Vogue Knitting, has designed patterns for all the yarns. I did not get a pattern book to go along with my yarn, and I suspect it's because they aren't finished yet! There is a sneak peak of some of the sweaters on the farm blog (scroll down). They look very interesting.

Oh, Findley.
This yarn is so soft and lovely. As soft and lovely as you would expect a silk merino blend to be.

And the colors are just lovely. I especially like the yellows and the blues, but the green is lovely too and well, I could just list them all as my favorite, but that would be silly. Really, they all deserve to be worked up into some fabulous project.

Considering I have four balls of each color (well, two of white) and each ball is a whopping 800 yards, I can make multiple fabulous projects.

Which means I'm totally spoiled for choice and was just a wee bit paralyzed when I first opened the box.

Findley lace swatch But I'm pretty sure I have it sorted now.

I was considering the Abotanicity sweater from Knitty. To that end I started swatching with the yarn held single on a US 1. That was kind of insane. It occured to me after several rows that people don't usually try to get a dense fabric with lace weight yarn. Also, since that pattern calls for fingering/sock weight yarn I don't think it will work out.

Since I'm not really a lace shawl knitter, I decided to expand my options by holding the yarn doubled on a US 4, which is this blue swatch.

That made me think of my friend Pam's Lacy V-Neck sweater that is in the Holiday 2009 issue of Vogue Knitting. (It's the middle one of the second row of the "A Softer Shade of Pale" patterns.) Those lacy bits you see in the blue swatch is the stitch pattern. I'm pretty sure it's going to work, which is very exciting.

The trick is deciding which color to use. I might stick with this robin's egg blue one. Although I'm debating the silver grey one, which I know is the influence of the magazine picture.

The next sweater I'm considering making is from the 2004 issue of Simply Creative Crochet magazine. I don't see a picture of it online. The sweater had a plain body and lace sleeves made with wee square flower motifs that are connected as you go along. I've had that pattern in my library for quite a while. The pattern calls for crochet thread, so I think this lace weight yarn will work. I crocheted a little swatch but it calls for a D hook and I only had a C available. My B, D, and E hooks have all evaporated!

Again, I'm not sure which color to go with. I'm debating between the burnt red and the pale yellow.

The last of the published patterns I have my eye on is the Jade Sweater from Elsebeth Lavold's "Book Two: The Sentimental Journey Collection." This book is very possibly out of print so if you see a copy grab it. This is another pattern I've had my eye on for a while. No hesitation on color here, I'm totaly using that royal blue. The trick with this one is the pattern calls for 5 sts/inch and I'm getting 6 sts/inch so I'm probably going to have to rewrite it for my gauge. Considering the small would have been big on me I would have been fussing with it anyway.

Findley w Plaid buttonThe final color I have plans for is the deep yellow goldenrod one. I want to knit something fabulous that will take lots of buttons because I think that yarn is a fabulous match for the tartan buttons I made. For this sweater I'd like to do something clever with a non-traditional neck line that goes diagonally across the sweater. You know, from the center neck down to one armpit.

The question is whether my knitting math skills are up to the challenge.

I'm also tossing around several shawl patterns that would use the yarn held single. And, of course, I'll have to reserve some for when the pattern books are available so I can make an official pattern.

Wednesday, April 20, 2011

KFI: Trellis Mitts KAL—The Pattern!

Trellis mitt 2 Knitters! Start your needles!

I have posted the pattern to Ravelry. You don't have to be a member to access it. Download Now.

It is a 5 page PDF with one picture. The charts are on page 5.

Sizing
I made the mitt to fit my 7" circumference hand, but it will stretch to comfortably fit a 8" circumference hand.

I suggest you make it with zero to negative ease so the lace pattern will open up and be visible.

If you want to make it bigger you can add a few stitches.

The smocking is in multiples of 4 stitches.

The pattern calls for a 48 st cast on. The next size up to make the smocking work would be 52 sts.

You can hide the extra stitches in the ribbing on the palm. Just remember your stitch count on each needle has changed.

If you do add stitches you might want to adjust the thumb hole placement instead of following my directions blindly.

I have you place the thumb holes 3 sts away from the design on the back of the hand. When you are ready to make the thumb, try the mitt on and see if you like where the thumb will end up. Is the pattern straight? Is it centered?

It sounds weird, but it will make sense when you can actually try it on.

If you do move the thumb remember to write down how many stitches in from the pattern it is so you can adjust the second mitt as well.

Connect
I've started a discussion thread for the KAL on the Ella Rae Facebook page for questions and chatter.

I've also started a discussion topic in the KFI group on Raverly. I'm hoping to keep the discussion confined to Facebook so questions and answers are easy for everyone to find, but I realize not everyone is on Facebook.

Enjoy!

Tuesday, April 19, 2011

KFI: Trellis Mitts KAL—Socks?

Trellis mitt palm The KAL starts tomorrow morning!

How exciting.

In the mean time, here is another set of vague ideas for altering the pattern. This time for socks.

Using the stitch pattern on a pair of socks was another suggestion thrown out by a Facebook fan. It almost derailed me because I do like knitting socks. I'd been so fixated on making a pair of mitts with a leaf motif that socks hadn't occurred to me.

Once the idea was presented I really liked it and might have to make a pair of socks to match my mitts in the future.

Since I haven't actually made the socks, these suggestions are once again untested, but here's what I can tell you so far.

Ribbing. Smocking. Whatever.
I was surprised to discover that the smocking was much more flexibile than I expected.

Why, yes, I did try to mitt on my foot. :-) My stitch count would be the same.

I think the trick will be not to pull the wraps on the smocking too tight so it can expand like ribbing. You might want to do a little swatch to see how it works for you. If you are going to need to make a sock cuff bigger than the as yet unrevealed mitt I can tell you the smocking is a multiple of 4.

Alternatively, you can ditch the smocking and just do normal ribbing, but where is the fun in that?

Stitch Patterns
The mitt fit my leg rather well and it if wasn't for the thumb I could have easily converted it to a sock.

I think part of the easy fit could be attributed to the fact that the palm of the mitt is 1 x 1 rib. That would have ended up the back of the sock leg. It strikes me as a little boring and I would want to do the Triple Leaf Motif on both front and back, with ribbing between, but I don't know what that will do to the sock fit.

The motif has some stretch to it, but I don't know if two motifs will have the cling that the ribbing provides.

The Triple Leaf Motif is over 15 sts (although as you'll see the stitch count does vary). I have it framed by twisted stitches, adding 4 sts to either side.

If you decide to work a motif on both the front and the back of the leg I would say add ribbing to the sides to make your stitch count work.

Heel to Toe
If you're taking the plunge to turn a mitt into a sock I imagine you are an experinced sock knitter who knows how to work a heel, gusset, foot, and toe.

Why not take the motif all the way down to your toe decreases?

In that case you might want to consider working the gusset decreases on the side or bottom of the foot to keep them from interferring with the motif.

The motif seems to have some vertical stretch to it as well, so you'll probably want to try on the sock regularly as you work the foot to get a good fit.

That's about all I can think of. I hope to see you tomorrow!

Monday, April 18, 2011

KFI: Trellis Mitts KAL—Gloves?

Trellis mitt 2Look at this, the pattern isn't even available yet and I'm already suggesting how to modify it.

Please Note: These ideas are theoretical, which is to say un-tested as I have not knit through them.

I'm presenting them as a jumping off point for you. I hope you are either an experienced enough glove knitter to run with them, or can modify an existing glove pattern you own to incorporate them.

You want fingers on those mitts?
When I posted the first in-progress picture of the Trellis Mitts on the KFI Facebook page someone asked if they could be made as gloves instead of fingerless mitts.

That had not occurred to me because I don't knit gloves. Not only do I think the fingers are fiddly and annoying to knit, but my hands get so cold in glove weather that I need the wind break of leather or fabric.

But, of course the question got my wheels turning and I came up with two options. I'm presenting them now before the KAL starts on April 20 as you'll need time to think about and prepare for them.

Provisional Cast On
The mitts are knit from the fingers down to the cuff, which has the potential of making it tricky to add fingers.

My first idea is to start with a provisional cast on. Knit the mitts. Then go back and knit the fingers up.

Keep in mind that when you reverse directions you loose a stitch so you'll have to account for that in your stitch count. It shouldn't be too noticeable visually.

You'll probably want to move the thumb up.

As you can see in the picture, I have the cast on edge starting rather high up on the fingers. This works nicely for mitts but won't be so good for gloves.

It's a simple fix. After you've worked through the smocking directions try the mitt on and decide where you want the transition from hand to fingers to land. Then start your thumb gusset there instead of where I tell you in the pattern.

After you finish knitting the mitt, pick up the stitches from your provisional cast on and work fingers according to a glove pattern that fits your stitch count.

Keep an eye on your yarn consumption if you knit the cuffs much longer that I tell you in the pattern. You don't want to run out of yarn while working your fingers.

Top Down Fingers
A few years ago I stumbled across directions on the nonaKnits blog for knitting gloves by starting with i-cord fingers.

She instructs you how to knit each finger, join them, then knit the hand. This method might be easier since you are traveling in the same direction as the mitts. Also you'll be able to place your thumb more accurately since the fingers will hold it in place when you try it on.

The gauge and stitch count look about the same, which will make this an easy addition. I would say start the smocking either right after you join the fingers or work a few extra rows of ribbing after the join then start the smocking.

Cuff up?
This option has to be addressed although I don't like it very much.

First, I don't like the way the Triple Leaf Pattern looks going the other direction. You can decide this for yourself either by tilting your head so my picture is upside down (haha) or knitting a swatch and twisting and turning it.

Second, this will require a lot more heavy lifting on your part. You'll be on your own for knitting the thumb gusset and placing the thumb hole.

Really, if you want to go cuff up, I'd suggest you find a glove pattern with a similar gauge and try to drop the lace pattern into it. Of course that leaves the fit a real wild card.

Join in!
There is an event for the KAL on the Ella Rae Facebook page.

I started a discussion thread for once the KAL get's going.

If I need to, I'll start a discussion in the KFI group on Ravelry, too, but I'd rather try to contain questions to one location so they are easier for me to find and respond.

Wednesday, April 13, 2011

KFI: Trellis Mitts KAL

Trellis mitts 2 You don't hear from me for ages and then I show up announcing my first Knit-A-Long, which I'm planning to start on April 20.

I have some gall.

I'd also like to ask why KAL doesn't translate into Knit-Along. I mean, that the proper spelling of the word, right?

Anyway.

That picture is of the unfinished right mitt. It is finished now but I haven't had a chance to take a picture. I'm working on the left mitt now and if I spent less time on the computer and more time on my knitting I might actually finish it.

On the other hand (hehe) part of me says not to finish the left mitt so I'll actually be knitting along with the, um, knit-along.

I've never run a KAL and I've actually only participated in one KAL for my Audrey sweater that I knit back in 2004 before I had a blog. And even then I just lurked and read what everyone was talking about.

That all means I'm kind of making this up as I go along.

A Gathering Place
The first thing I did was set up and event for it on the Ella Rae Yarns Facebook Page. I have 40 people attending and 20 maybes. That's pretty exciting, especially considering the only promoting I did was post that picture on the wall of the main KFI FB page. Well, prior to this blog post.

I had it in my head that I'd be able to send updates and such to event attendees, but I don't see that capability. When the time comes I plan to try to channel everyone to the discussion section. Of course I'll also set up the pattern on Ravelry and start a discussion thread in the Ella Rae group there.

Materials and Gauge
Yarn: Ella Rae Lace Merino (Fiber: 100% Superwash Merino Wool
Yardage: 460 Stitches: 6.5 Needle size: 4 Ball weight: 100g)

Needles: Set of 4 size US 2 dpn (or size needed to obtain gauge)

Gauge: In stockinette stitch 7 sts x 10 rows per inch worked in the round.

Sizing: I made the mitt to fit my wee 7" circumference hand. But I also made the palm in ribbing so it would have some stretch. On Friday I took it to the Library Knitting Group and let several people try it and then measured their hands. It comfortably fit up to a size 8" circumference hand. I suggest you aim for zero to negative ease, which will open up the lace pattern. The mitt I made it about 7 inches long, so it comes well down the mitt.

When the KAL starts I'll give suggestions on stitch count to make it a little bigger in circumference. I'll also give suggestions on making the section between the fingertips and the thumb shorter. As with my Top Down Alpaca Mitts the Trellis Mitts are worked from the finger knuckles down to the wrist as I feel this gives more options for length modifications.

The pattern is almost ready. I've written it up and sent it off for proofreading. My friend Danni has already sent it back and Pam said she'd have a look too, but she was having trouble opening the document.

I was going to dole out the pattern a section at a time, but now I've decided to just release it and let people work at their own pace while I'm availalbe to answer questions. Hopefully everyone will chat and share progress pics as well!

I've decided that Facebook can't be trusted not to eat the pattern based on it's tendancy to eat status updates and discussion entries. Therefore I'm going to see about having posted on the KFI website and just link to it.

Other Yarn Suggestions
I attempted to post this information on Facebook, but it disappeared, so you can understand why I'm bitter.

Lace Merino from Ella Rae, the yarn I'm using, is a fingering weight yarn. The "ball band" gauge is 6.5 sts/inch on a US 4 needle. The pattern gauge is 7 sts/inch on a US2.

Here are some other yarns for you to consider based on weight:
Araucania:
Itata or Ranco Sock.

Debbie Bliss:
Casmerino Baby or Rialto 4.

Louisa Harding Kashmir Baby.

Noro:
Taiyo Sock or Silk Garden Sock or Kureyon Sock.

Queensland Collection Sugar Rush.

Sirdar Snuggly 4 Ply.

Sublime Baby Cash Merino Silk 4 Ply.

Phew! Ok, what else would I need to tell you? Well, nothing at this point. Really, the picture is all the persuasion I probably need.

I hope you'll decide to knit along with me!