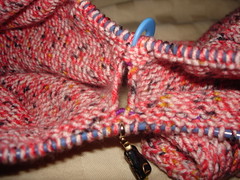
 Even before I reached the row where I was supposed to join the sleeves to the body I knew I was going to have a problem since I'm not binding off any stitches for the underarm.
(Photo: this is looking at it from the inside. I believe the body is on the left and the sleeve is on the right.)
This means there is no gusset leaving the door open for a hole in the armpit. Also, there were no little flat spots to line up.
The second problem was easier to overcome. I put the sleeves on, made sure the ribbing was straight, then clipped a removable stitch marker to the center of the armpit.
I used those stitch markers as a guide to match the center of the sleeves to the side of the body.
I thought I'd address the first (hole) problem when I was in the process of joining all the pieces together, but I ended up flustered and forgot.
Mind the Gap
Fortunately, I only worked one row after the joining and then ran a lifeline. Then was dragged away to play pinochle. (shudder)
When we got home on Sunday I took a hard look at the situation.
As Lucy Neatby would say, those were some unhappy stitches.
Instead of being snugged up next to their neighbors on either the body or the sleeve as they wanted to be they were being pulled in different directions. It reminded me of the little hole you get at the top of the sock gusset after picking up the heel flap.
I knew the hole was exacerbated by the proximity of the needles. And it occurred to me it might be less noticeable once the sweater was done. But I also knew I'd probably have to go back and sew it shut some how.
Either way, it was unacceptable and had to come out. Good thing I had that lifeline in place!
Fancy Stitch Swapping
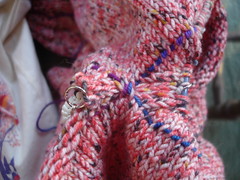
 I put the front and back of the body on separate needles.
Then I divided the sleeves over two dpns each.
(Photo: this is looking at it from the outside. If you click on the picture it should take you to a bigger version on Flickr. The blue/purple yarn is my lifeline. It will just pull right out.)
Happily, everything was already lined up properly because of the lifeline.
Ok, stick with me, it didn't occur to me to take pictures while I was knitting.
Have you ever been working in the round and done that trick where you move the first stitch cast on off the left hand needle to the right hand needle, then pull the last stitch cast on off the right hand needle over the moved stitch as though you were binding off but keeping it on the left hand needle? Then worked the formerly last stitch as your new first stitch?
It helps prevent that little gap on your joining row.
Well, I did something like that.
When I got to the end of the front of the body, instead of working the last stitch I slipped the last stitch on the sleeve (second dpn) to the body needle, then moved the last body needle over to the dpn.
Then I knit the moved sleeve stitch.
Then I moved the first stitch for the sleeves off the dpn over to the back body needle, and pulled that first body stitch over to the first sleeve dpn.
And I knit around like normal. Repeating the process for the other sleeve.
Yes, it was as fiddly as it sounds and the stitches weren't happy being yanked all over the place, but I bent them to my will!
There is a little X in the underarm now.
Haute Couture
After fixing the gaps I worked a few rows then couldn't resist trying the sweater on to see if it really had a fighting chance of fitting.
I transferred everything to a second lifeline and squirmed into it.
"Um, is that all there is?" Hubby asked, looking at me sideways. "Because it's kind of revealing."
The sleeves came up my arm and the body just barely covered the important parts. It was basically a strapless sweater. Stylish, but not very practical.
He confirmed that I should NOT take a picture of it in that condition for the blog. Sorry.
I guess it fits. It's a little hard to tell since there is nothing to anchor the top. I might try it on again in a few more rows. I might be able to take a picture of it next time, since it will be less revealing.
Now I'm just slogging through the yolk and raglan decreases. It felt like each row took a really long time to work, and then I realized I started with 300 stitch. So, yeah, that would take a long time.
I'm not expecting any more knitting excitement until I get to the neck shaping about 40 rows from now.

No comments:
Post a Comment