
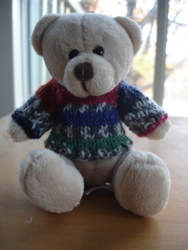
 You remember the adorable little teddy bear I picked up on my trip to Florida, right?
Well, that t-shirt he came with was just too boring and over sized for me to stand, so yesterday I made him an adorable little sweater out of some leftover Regia sock yarn I had in my stash.
Which means his sweater matches two pairs of socks and my Hooray For Me Gloves. snicker.
The sweater used about 4 grams of yarn. I don't know the yardage because I don't really want to rip it out to measure, but it took about one complete repeat of the color pattern. Oh, hey, I have yarn left, I could measure that. Considering the small amount of yarn required, this would be a good project to use up little bits of sock yarn you have laying around. If you also had a little teddy bear of this size laying around.
So here is the pattern, but I've also entered it into Ravelry. There is a link to the PDF on Ravelry over in the sidebar, that should work even if you aren't on Ravelry.
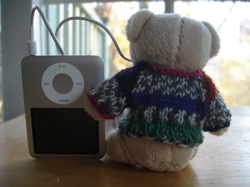
In the pictures further down Teddy is posing with a CD and my iPod Nano so you can get an idea of his size. I thought what can I put him next to that will be fairly universal size-wise and those were the best things I could think of.
Mini Teddy Bear Raglan Sweater
By Traveling Ann Designs
Creative Commons Attribution-Noncommercial-Share Alike 3.0 License
Size: X-Small. Finished chest 5 1/2 inches to fit a 4 1/2 inch belly.
Materials:
Yarn: Fingering Weight: 4 grams (approximately)
Model shown in Regia Jacquard Color
Needle: 2.5 mm dpn (or size needed to obtain gauge)
Gauge: 7 sts and 10 rows = 1 inch
Notes:
Body is worked in the round to the armholes.
Sleeves are worked flat.
Abbreviations:
BO—Bind off
CO—Cast on
K—Knit
K2tog—Knit next 2 sts together
P—Purl
RS—Right Side
SSK—Slip, Slip, Knit
St(s)—Stitches
St st—Stockinette stitch
WS—Wrong Side
Pattern:
CO 38 sts
Join to work in the round, being careful not to twist sts.
Work 2 rounds K1, P1 rib

Change to St st (knit every stitch) and work until piece measures 1 inch from cast on edge.
Create armholes:
BO next 5 sts for armhole, K13, BO next 5 sts, K13 (28 sts)
Divide for front and back:
Slip 14 sts for front onto one needle so they are easier to work.
Slip 14 sts for back onto one needle and ignore for now.
Front:
Working on 14 sts for the front only, P across row.
Next row: K1, SSK, K to last 3 sts, K2tog, K1 (12 sts)
Next row: Purl
Next row: K1, SSK, K to last 3 sts, K2tog, K1 (10 sts)
BO
Back:
Reattach yarn and work as for front.
Sleeves (make 2):
CO 16 sts
Work 2 rows in K1, P1 rib.
Work 4 rows in St st (K on RS, P on WS)
Next row: Next row: K1, SSK, K to last 3 sts, K2tog, K1
Next row: Purl
Repeat last two rows 4 more times, ending after decrease row. (6 sts)
BO
Sew itty-bitty sleeve seam.
Attach sleeves to body.
What a cute little sweater!! Thanks Ann! :)
ReplyDelete